

Multirotors:
Cinestar 6 Hexrotor [Post Archive]
Fixed Wing:
Tinyplane
Skyfighter [Video]
Flying Thing Links:

Status: Completed
Specifications:
Weight: 138g
Additional Payload: 30g
Frame: Custom PCB
Props: 4x2.5
Battery: Turnigy nano-tech LiPo: 370mAh @ 3S
Motors: HXM1400-2000
ESCs: Toshiba TB6588FG
IMU: Pololu minIMU-9
Controller: Arduino Pro Mini
4pcb is a micro-size quadrotor (4" props). It's named 4pcb because the entire structure is a single printed circuit board (printed by Advanced Circuits, http://www.4pcb.com). Fiberglass is pretty strong, right?

After helping out with a previous quadrotor build, I wanted to make a smaller one and combine the electronics and structure into a single board. The most important part to find was a surface-mountable brushless motor control IC. Luckily, the TB6588FG does the job nicely, taking the place of hobby ESCs and the associated wiring. It also has better dynamic performance than hobby ESCs, since it uses an analog speed command instead of RC-style 20ms PWM.

4pcb uses hexTronik HXM1400-2000 5g brushless motors with four 4x2.5 props, each of which produces about 50g of thrust. The the processor is an Arduino Mini and the IMU is a Pololu minIMU-9. The battery is a 370mAh 3S LiPo and the radio control is done via XBee. The entire quadrotor weighs 138g. For a sense of scale, here it is perched on another quadrotor's prop:

Here is some video of it flying:
Also, if you would like to try building on for yourself, I wrote up a PCB Quadrotor Instructable that goes into detail on how to create this exact quad or modify it into your own project. (6pcb?!) The source files, including board files, Arduino project, and ground station source code (VB .NET), are all here:
4pcb_DOC.zip (1.83MB)
Kramnikopter:

Status: Retired
Specifications:
Weight:
Additional Payload: 200g
Frame: Turnigy Talon
Props: 9x5, 10x4.7SF
Battery: Turnigy nano-tech LiPo: 1.8Ah @ 4S
Motors: CF2822-1200, NTM 2826A-1200
ESCs: Turnigy Plush 18A, FFv1.2s
IMU / Controller: KK Multirotor Control Board
Kramnikopter is a completely off-the-shelf quadrotor build based on the Turnigy Talon frame kit. It's named after an identical build by Daniel Kramnik, of Tesla Coil fame. After flying his Talon, I decided that I liked the frame enough to build my own. It's the perfect size: large enough to be controllable, even in wind, but small enough to fly indoors. The build quality is excellent and I would definitely recommend this frame to anyone who wants an inexpensive quadrotor to play with. The entire kit, including radio, can be purchased for about $150.
Also, if you would like to try building on for yourself, I wrote up a PCB Quadrotor Instructable that goes into detail on how to create this exact quad or modify it into your own project. (6pcb?!) The source files, including board files, Arduino project, and ground station source code (VB .NET), are all here:
4pcb_DOC.zip (1.83MB)
Kramnikopter:
Status: Retired
Specifications:
Weight:
Additional Payload: 200g
Frame: Turnigy Talon
Props: 9x5, 10x4.7SF
Battery: Turnigy nano-tech LiPo: 1.8Ah @ 4S
Motors: CF2822-1200, NTM 2826A-1200
ESCs: Turnigy Plush 18A, FFv1.2s
IMU / Controller: KK Multirotor Control Board
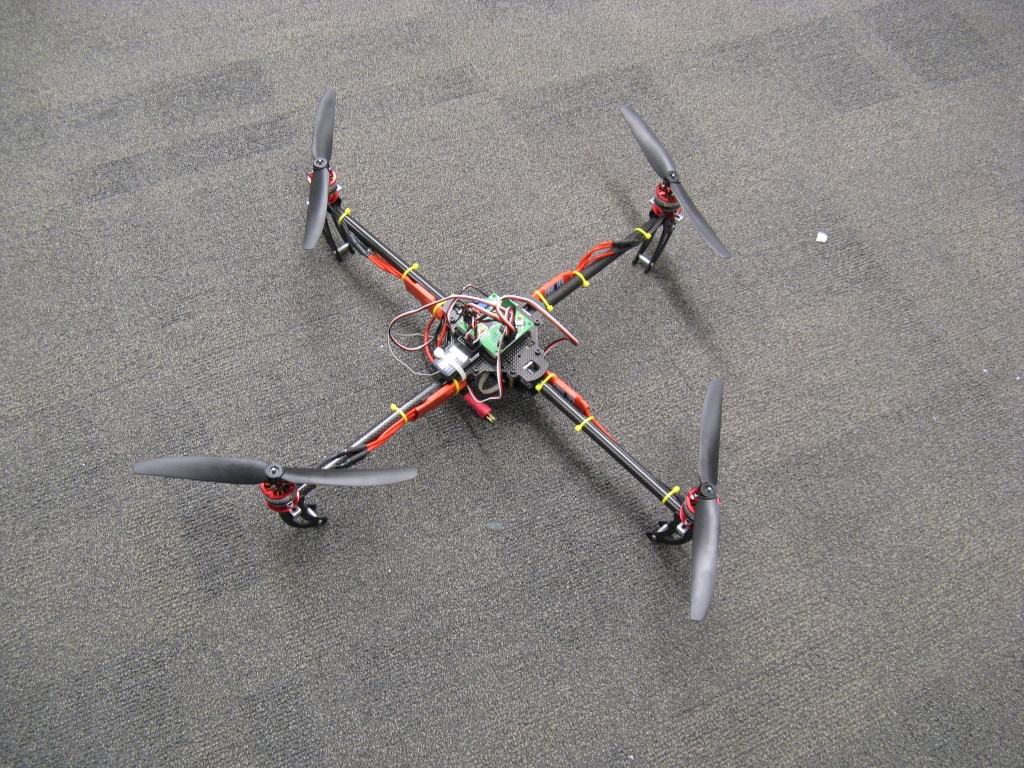
Kramnikopter is a completely off-the-shelf quadrotor build based on the Turnigy Talon frame kit. It's named after an identical build by Daniel Kramnik, of Tesla Coil fame. After flying his Talon, I decided that I liked the frame enough to build my own. It's the perfect size: large enough to be controllable, even in wind, but small enough to fly indoors. The build quality is excellent and I would definitely recommend this frame to anyone who wants an inexpensive quadrotor to play with. The entire kit, including radio, can be purchased for about $150.
 |
| Pictured with 4pcb, for size reference. |
This size quadrotor frame is also ideal for carrying average-sized still cameras and small video cameras, up to about 200-300g. I mostly flew it with a fixed-mount GoPro Hero 2. There are now nicer quad frames available for not much more money, so I've mostly retired the Talon v1. But it did serve me well for long time for testing and video:
Good for spying except it's noisy! I say it's good for flying and a great example of combining the functions of several components in to one piece, like a motorcycle that uses the engine as part of the frame. Well done!
ReplyDeleteAmazing price... more people need to know of that thing! $15 dollers for an imu on hobbyking? Dmn...
ReplyDeleteGreat work bro!
ReplyDeleteDude can u help me out .im doing a project for my engineering course we kinda zeroed in on the quadrotor idea .i read on the instructables site .plz can u help
ReplyDelete- pathakrutvij541@gmail.com
I'm doing a quadrotor completely from myself.....the foundamental problem of complementary filter is the noise off Accelerometer...in my case often the noise take +/- 500mG.....is normal...i try all think...rubber balanced motor and propeller. My coeff filter are.
ReplyDeleteGyro = 0.99 e Acc = 0.1 in addition i did a Low Pass filter at 5Hz from the raw data of accelerometer.
what can i do??
alexzupo@libero.it
Great Work!!!! Hi Mr.Scolton . I want clone your 4pcb quadcopter project but in normal size with 8*4.7 props. I read your diy instructions and arduino source. can i make my quadcopters with this sources? (size of props different!!!!:(() in sources i see this constants: // 4in x 2.5in 2-blade props, x mode
ReplyDelete#define KP 0.7 // [command/deg]
#define KI 0.0 //
#define KD 0.2 // [command/deg/s]
#define KY 0.3 // [command/deg/s]
how can i change this constants to make my fly? i will use a normal size X quadcopter frame .... please help me! please! thanks and sorry for my bad english
unable to download can you mail me the code plz
ReplyDeleteUpdated the link for the PCB quad source files above.
DeleteWonderful. I wonder whether those super-duper hall-effect current sensors could be replaced with .. just PCB traces (shunt), designed for say 5..200 mV drop, detectable with the ADC for cost reduction. I would test whether it works, but your FF v1.2s & other ESC design files are unavailable (google drive links're dead).
ReplyDeleteI don't have enough strength to make FOC, so I'll try simple BEMF-based switching.
Low-side shunt resistors are very common, so I suspect just a trace would work too. Might not be as consistent as a 1% resistor but with calibration it would probably work just fine.
DeleteYes, Google Drive disabled hosting so all my links went dead again! Here's a new listing:
https://scolton-www.s3.amazonaws.com/list.html
I would like to suggest the best book on Drone or Quadcopter making. "The DIY Drones for the Evil Genius" book https://www.onlinebooksreview.com/articles/build-drone-book#1259861465 shows you how to construct the most powerful drone from very inexpensive parts. All the guideline are given very specifically and with step by step explanations. It offers you how to add personalized features and make yourself a full-fledged pilot. It covers not only the safety and mechanics but also shows you a perfect drone design and complete assembly. It will make yourself more efficient for implementation of your idea.
ReplyDeleteI normally remove comments with links but this one made me nostalgic for the days when drones were called quadrotors and building your own was actually the only way to get one.
Delete