Showing posts with label sensorless. Show all posts

Tuesday, March 4, 2014

Link Update / Sensorless Gen. 1 Documentation

All of the documentation links on my site are dead.


It will take me some time to go through each one and re-link it to its new location. For the most part, everything will mirror to a Google Drive Amazon S3 folder, as such:

http://web.mit.edu/scolton/www/filter.pdf is no more. For some reason it is without a doubt my most downloaded file. I guess I will take that as a complement. The new location is:

Other documents of importance in http://web.mit.edu/scolton/www/ are moved to that same shared folder. Some more examples:


Since it's a shared folder, you can look at what else has been moved:
https://googledrive.com/host/0B0ZbiLZrqVa6Y2d3UjFVWDhNZms/
https://scolton-www.s3.amazonaws.com/list.html
[Edit: Sorry! Google Drive disabled hosting. I've moved individual files over to Amazon S3 and will update links accordingly.]

In return for temporarily killing all of my documentation links, I will post some new old documentation that has been a long time coming:

Flux Observer-Based Sensorless Field-Oriented Control of  Surface Permanent Magnet Synchronous Motors (Gen. 1)
or, What Does the Flux Say?

https://s3.amazonaws.com/scolton-www/motordrive/sensorless_gen1_Rev1.pdf


This is an attempt to document my first attempt at sensorless field-oriented control (hence, Generation 1). The hardware implementation of this method was finished more than a year ago, but the documentation has been slow to catch up. I did a few posts on it, but only teased at the complete documentation of the Gen. 1 method. Well, here it is. Better late than never, I guess.

Originally, I expected this method to be a baseline, possibly the simplest implementation I could think of that would lead to more advanced techniques. Maybe Gen. 2 will be that step. But as is usually the case with my projects, just the act of actually building hardware and software has helped clarify my understanding of the problem, to the point where I could actually see the benefits of the simpler method and work it into an analysis framework that allows it to be deployed quickly and easily on new motors. And by quickly and easily, I mean with great pain and frustration unless you have a thorough understanding of how it works. Which is the point of the document, I guess.

For sure, the solution is not complete and not even ideal. It's just something that I use as a technical reference and might be useful in that context to others as well. I don't plan on commercializing the implementation because of the effort that would be involved in bringing it up to the level of being a reliable and user-friendly product, or even a development kit capable of being used by others to create such a product. (If it is to be commercialized, the improvements over Gen. 1 will be proprietary anyway.) But hopefully the information it has can be useful.

If you are looking for more of a developer-friendly kit / API for sensorless FOC, Texas Instruments has a solution called Instaspin FOC that I've been following since before it existed (motor control hipster-style): 
Although I can't be sure, I suspect the basis for it is also a flux observer. I'm sure the implementation is a lot more thorough, though.

Anyway, the field of motor control is vast and there is tons of information available. What's needed are people to take that information and use it, yes, but also improve it. Not just copy-paste into a system but also twist it into something different, find a better and faster way to do it, port it to new hardware. Not just ask questions about it but answer them in a new way. That's the challenging and fun part, IMO. Good luck!

Now back to fixing dead links...

Tuesday, March 26, 2013

Motor Dave is Back! (And so am I...mostly.)

I took a bit of a break from blogging to move across the country.


Loading up my cube during the coldest day of the year in Boston.
I escaped the Northeast right before the string of major snow storms and am now based in sunny Seattle at a company called Freefly Systems where I will be...doing pretty much the same thing I did in academia, over-engineer motor and control systems. I may occasionally re-post some cool videos from the job, but for the most part this blog will remain dedicated to my personal projects.

Some brief updates:

My custom-built glass table survived the trip, somehow:

The right angle joints rotate up to protect the corners of the glass. I totally designed it this way...
Pro-level ratchet strapping.
And I finally have enough room to put all four chairs around it!
If you ever find yourself needing to move a 100lb slab of glass across the country, let me know and I'll give you some tips.

I now own a car:

It's a bit wet in Seattle, actually....
If you don't believe me, figure out what this is a picture of.
Well, I own some fraction of a car...maybe 25%? More than I used to, anyway. Unlike Boston, It's pretty much a requirement for getting around. I haven't owned a car since high school and the car I had back then was worth less than my computer, so I'm glad to finally have something (hopefully) reliable and fun.

My Tesla coil in now only 3-4 orders of magnitude less impressive than a oneTesla:


I intentionally did not ship my coil with the rest of my possessions because I wanted to work on it a bit more before I left. (I promised Clare Fairchild that it would make some form of sparks before I left.) All systems seem to be working as expected up to this test which was at 48V DC input, so still low power. I carefully wrapped and shipped the coil separately so that I can continue to work on it here, when I get the chance, tuning it and turning the power up so that it can break out on its own. Once I get some respectable arcs, I will take another stab at writing a MIDI parser so it can play music.

tinyKart is a wreck, but it's getting a complete overhaul:

What
the
fuck 
happened
here?
Pretty much every part is covered two years worth of dirt deposited by snow and rain, including the most recent stretch of endurance laps run during a severe downpour at Maker Faire NY. Besides that, the damage report consists of: both pulleys and motor shafts (destroyed), one drive belt (destroyed), two spindles (bent), one brake mount (bent), both chassis plates (bent), and at least one full set of tires. Basically, the whole thing needs to be taken apart, cleaned, and fixed. However, that gives me the chance to do something I've wanted to do for a while: paint it.

Multirotor-assisted primer drying. Very effective.
It's done a lot more than we originally thought it would, so a bit of maintenance is definitely in order. It might take a bit of time to get it all back together properly, but when it is, it will look much better than it ever has, I think.

Lastly, Motor Dave is back! Dave Wilson, "Motion Products Evangelist" at Texas Instruments, has returned to the bloggernet as well with a new series on how to tune your PI controller, starting with Part I here. It's specific to the typical nested PI controllers involved in motor control (current, speed, position). If you haven't read his previous series, The Ten Commandments of Digital Control, you should. It starts here. I went to a TI workshop co-hosted by Dave about a year ago when TI's BLDC solution, InstaSPIN, was relatively new. At the time he hinted that there might be a future version: InstaSPIN FOC. Well, it's here now!

If you've been following my blog for a while, you probably have seen my many many posts of Field-Oriented Control, sensored and later sensorless implementations thereof. One thing I've not been very good with is putting out hardware that other people can easily access and play around with to try out this powerful motor control technique, without messing around with a lot of low-level code. (I like messing around with low-level code, but I can totally understand why most people hate that part.)

Anyway, you can now buy a kit for $300 that has enough power to drive a small electric vehicle motor and is loaded with a thorough FOC code library. Alternatively, you can just buy the control card with FOC library and develop your own high-power inverter stage. Or you can just buy the TMS320F28069 microcontroller with built-in FOC library and use it in your own hardware.

Though I haven't dug too deeply into the code, the basis for InstaSPIN FOC, and particularly the FAST observer, seems somewhat similar to the flux estimating structure I've used in my own sensorless routine. Flux is a nice quantity to observe, since it isn't speed-dependent like back EMF. The tricky part is keeping the observer happy at low speeds where not much rotor position information is available. InstaSPIN FOC seems to handle this situation using a "forced-angle" startup routine but then can also transition back through zero speed seemlessly when properly tuned.

I'm not sure it would cause me to deviate from making my own FOC software, but it's definitely something worth checking out. 

Monday, June 18, 2012

Get down from there, flux. You're not DC. You're not even a real measured quantity.

I recently fixed a nagging problem with the flux estimator, maybe the key part of my sensorless field-oriented control method. I'm in the process of writing up my current approach to sensorless control, so I've finally been generating some nice figures (ones that aren't made in PowerPoint) that will hopefully explain some of the math better than I can in words. Here's what the flux estimator looks like:

I guess if you use LabView this is what the code looks like too...
The flux estimator takes the phase voltage and phase current as inputs, and runs them through the constitutive equation for a round-rotor permanent magnet motor:


The result of the integral form of the equation is the phase flux linkage. This, like back EMF, contains information about the position of the rotor. Unlike back EMF, it doesn't vary with speed, which makes it a nicer quantity to estimate in most cases.

Doing an integration in software on real signals is not always practical. Ideally, the voltage and current are purely AC signals. But in real life they may have some DC offset for a variety of reasons. The current sensors may not be well-zeroed. Even so, the zero value may drift and there will always be at least some offset at the minimum resolution of the sensor. The voltage comes directly from the known PWM values, but it could also be biased due to rounding or other numerical issues.

Any bias on the input signals would cause a pure integrator to ramp the output up to infinity. For that reason, it's common to implement an integrator as a low-pass filter instead. At high frequencies, the a low-pass filter with the appropriate gain behaves the same as a pure integrator. That gain happens to be exactly the same as the time constant. Another way to think about it is that it's a pure integrator in series with a high-pass filter. This lead to the same transfer function and behavior: integrating frequencies above cutoff but attenuating any DC bias.

Attenuate...but not eliminate. 

The pseudo-integrator's DC gain is the time constant of the low-pass filter. So, although it won't ramp off to infinity, there will still be some DC bias in the flux estimate and it will get worse as the time constant for the low-pass filter is increased. This creates a bit of a trade-off, since increasing the time constant can help improve the low-speed performance of the flux estimator but will cause more flux estimate bias. Here's what the flux estimate looked like on the CineStar 6 QC-3328 motors at approximately hover speed:


There are a few things to notice. One is that the current waveforms are offset by at least 1-2A. (Look at the maximum and minimum current on each phase.) With a nominal phase resistance of 46mΩ and a filter time constant of 6ms, that would lead to a flux bias of (2A)(46mΩ)(6ms) = 552μWb. This is almost half of the expected flux amplitude, and it shows in the flux waveform, which is shifted up by quite a bit. The flux estimator has a saturation parameter, set to 1500μWb, and you can see the top of the waveform being clipped in this data.

Before attempting to reduce the current sensor offset, I took out the easier problem, which is the voltage offset. The 3-phase sinusoidal voltages are generated according to an 8-bit sine look-up table (LUT) which stores 256 numbers between 0 and 255 that trace out the amplitude of a sine wave. As it turns out, the actual average of these numbers is 127.5, not 127. This alone could shift the flux waveform up by (0.5/255)(25V)(6ms) = 294μWb. Just by switching to more precise math when calculating the voltage on each phase, I was able to eliminate this source of offset immediately:


The clipping of the flux linkage waveform at 1500μWb is no longer present, but there's still a good amount of bias. The next step I took was to have the current sensors auto-zero at the start of the program. It's an obvious and common thing that I neglected to do mostly because I kept saying, "I'll do it later," and I didn't realize how much it would matter to the flux estimator. After adding in a simple auto-zeroing routine, the flux is now back to dead center:


There's an interesting pattern present in this data which I think was caused by sitting at a very steady speed for pretty much the entire capture. Maybe now that the flux waveform isn't being clipped, things settle in to a more regular pattern. Or maybe I just happened to sit at exactly the right RPM for aliasing like this to occur. Either way, to confirm that it wasn't a problem I had just introduced, I redid the test and varied the speed a lot more:


Here, the current is more varied because I was accelerating and decelerating a lot. But the flux waveform is still clean and centered around zero. I wasn't sure how much this fix would improve the performance of the sensorless position estimate. For sure, you can hear the effects of the waveform clipping on certain motors. Here's a GIF of all three flux/current waveforms to better show the difference:


The third, most unbiased flux estimate also produces the most uniformly-spaced and scaled current signals, which is probably a good thing in terms of efficiency. The flux zero-crossings will be evenly spaced, which should improve the position estimate and the FOC. Initial bench tests seem good, but I'm really looking forward to putting the improved version on all six ESCs and doing another CineStar flight test, this time with a Watt Meter.

Sorry for the boring all-math post. But it was interesting to see an immediately obvious cause-effect relationship in this quick and simple fix.

Thursday, April 19, 2012

Sensorless Start-Up / Speed Control

It's spring demo season again. I'll be at the Cambridge Mini Maker Faire on Friday, along with the MITERS crew, with an assortment of projects. Come check it out. Follow-up post to come.

For now, time for a massive multi-controller update. The Sensorless, Sine-Commutated Field-Oriented Current Control (SSCFOCC) algorithm I've been working on has been sufficient abstracted now that I can develop for it on two different motor controllers (
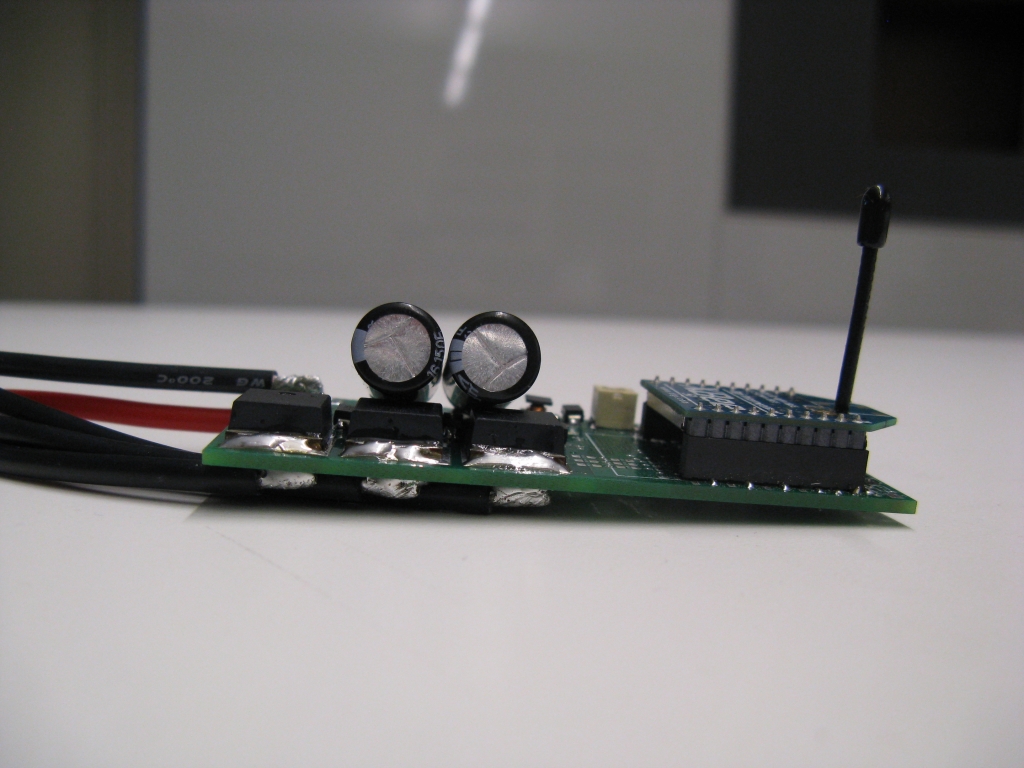
3ph v3.1 and FFv1.0) at the same time. (3ph v4.0 is coming soon and DirectDrive v1.0 still exists, I promise...)

Before I start developing new hardware and potentially writing a entirely different sensorless control algorithm, though, there were some loose ends I wanted to clean up in the current algorithm. Once these points are addressed, I will go back and write up a summary of my first-generation sensorless code since by now it's too complex for individual blog posts.

But First...


More Position Filtering

Loose End #1 was a problem with the rotor position estimating filter used to clean up the rotor angle at high speeds. I added this at the end of the last sensorless post and even though it immediately improved the high-speed performance of FFv1.0 on the hexrotor motors, there was a weird side-effect on the flux vs. angle graph. The flux estimate would begin to lead the rotor angle estimate at high speeds, which should not happen since the rotor angle estimate is derived from the flux estimate. The flux vs. angle curve should be constant. What the?

After staring at the code for a little while, I identified this a rather complex software error on my part tracing all the way back to a subtlety of BWD's sensored FOC code... I'll spare you the details, but I fixed it and now the flux estimate is much nicer:

Pneu Scooter w/ 3ph v3.1. Compare to unfiltered flux estimate.
Much of the "noise" from the 2d plot is shown to be offset at low speed (<200rpm).
Hexrotor motor with FFv1.0. Compare to the unfiltered flux estimate.
And in nauseating pseudo-3d.
The low-speed offset is a known issue having to do with the fact that the integrator at the heart of the flux estimate is implemented as a low-pass filter. There is also a phase offset in the flux estimate resulting from this practical non-ideality:


Since this is a known offset, it could potentially be subtracted off. Or the low-pass filter could be designed such that at the start-up routine exit speed, the offset is less than 15º or so. For the data above, that would be about 150rpm. Speaking of start-up routines...

Start-Up

Loose End #2 was the lack of any start-up routine for either controller. I've been putting it off for a number of reasons. For one, Pneu Scooter really doesn't need a start-up routine. The sensorless algorithm has no trouble picking up the rotor speed at as low as 50rpm and that's well within single-kick speeds:

One kick gets to 75rpm, at which point the flux estimator has locked in.
Also, Pneu Scooter really doesn't have enough torque to justify a no-kick start-up routine. Even at peak current (40A), the acceleration is something like 150rpm/s. The sensorless start-up will achieve far less than peak torque, though, since it won't have the benefit of optimum current vector placement. So it could mean a couple seconds of balancing on a barely-moving scooter while the speed ramps up. It's just much more natural to kick start.

FFv1.0 and the hexrotor motors, on the other hand, almost definitely need a start-up routine. Even though in this video, a very large (14x4.7SF) prop starts cleanly and quickly with no start-up routine at all. The command PWM goes high enough that the motor is forced to do something, and by luck it gets kicked in the correct direction at sufficient speed for the flux estimator to lock in. But this is unreliable (works maybe 50% of the time) and inelegant, so it should really have a slow-ramping startup routine as well.

Maybe the real reason I haven't implemented a start-up routine yet is because it's easy. At least, the most obvious way of doing it is easy. Lacking position information, there isn't much choice in how to drive a brushless motor: it becomes a coarse stepper. Except with sinusoidal commutation it can be like a microstepping coarse stepper, which is still pretty smooth. The point is, the only way to drive it with no knowledge of the rotor position is to put current in somewhere and wait long enough to know that the rotor has most likely reached the position you told it to go to. With that in mind, I wrote a simple start-up routine with four states:
  1. IDLE: Wait at zero speed until the user commands a positive torque or speed.

  2. PARK: Place current vector at a fixed angle and wait for some time for the rotor to reach a stable position.

  3. RAMP: Rotate the current vector with a constant angular acceleration that is sure to be achievable by the rotor given the amount of current commanded and the estimated load inertia.

  4. RUN: After a certain speed, switch to sensorless field-oriented control using the rotor angle predicted by the flux observer.
The ramp state here differs a little from BLDC-style sensorless start-up routines that use six-step voltage-mode commutation. Since this ramp state is still current controlled, the possibility for variable user-commanded acceleration during "open-loop" start-up is present. The angular acceleration of the ramp is linked to the amount of current commanded. If you go light on the throttle, the ramp takes longer.

Since the load inertia can't be exactly known, the start-up ramp acceleration has to be conservatively chosen. The start-up torque will therefore be significantly less than the run torque, and the efficiency will be very low. This is a common trait of sensorless start-up algorithms and the best way to minimize the effect is probably to get out of start-up as soon as possible. Transitioning to closed-loop sensorless control at 5-10% of the maximum speed seems to be achievable.

Anyway, enough hypothesizing. Here is my first shot at a sensorless start-up for Pneu Scooter, the harder of the two challenges:


The ramp goes from 0 to 150rpm in about 3 seconds with 30A commanded current. This is about 50% of the acceleration that would be expected from closed-loop control, so it feels sluggish for the first three seconds. But, it is smooth and transitions cleanly to run-state closed-loop control at 150rpm. Making the ramp faster results in pole slipping, so this is about as good as it will get.

One option for improving the start-up is to get out of the ramp state earlier. The flux estimator is able to pick up the rotor movement at as low as about 25-50rpm, so waiting around until 150rpm sounds silly. But, the low-pass filter-induced phase lead is still very high at those speeds, so the transition doesn't work reliably. It's clear that the low-pass filter time constant and the ramp exit speed are coupled in this way. Something to think about for future optimization.

Another option is to use more current. This doesn't help the efficiency, but it will create a faster ramp. 60A for a short period of time shouldn't hurt the motor or controller, but I'll wait for 3ph 4.0 to test that.

Start-up for the hexrotor motors is a much simpler problem. For one, they have essentially no load at start-up when the prop is moving too slowly to create significant thrust or drag. The performance of the controller is also not at all dependent on low-speed torque characteristics since the minimum RPM seen in flight will be well above the run-state threshold. Here's a very light ramp (<5A) for the 14x4.7SF prop:


The threshold for transitioning from ramp state to run state is 600rpm, and once it transitions to run state the torque increases dramatically. The ramp can afford to be much faster without slipping poles, but for the purpose of reaching a safe idle speed for the prop, it almost doesn't matter. Note that the speed goes directly to idle speed, 1,000rpm, and sits there. That brings me to...

Speed Control

Loose End #3 is speed control for FFv1.0. Pneu Scooter, as a vehicle, is happy with current (torque) control. But for the hexrotor, the master controller may want to command an exact speed for each rotor. Speed is directly related to static thrust (though not linearly). Steady-state current is also related to static thrust (close to linearly). But with inertial transients to deal with, the performance of a speed-based controller might be better.

Actually, the simple way to do "speed" control is to directly vary the PWM duty cycle, bypassing the current control entirely. This controls speed because motor speed is approximately proportional to applied voltage, which is controlled by the PWM duty cycle. As it turns out, it's definitely possible with the modified Synchronous Current Regulator (mSCR) to use this control mode, bypassing the q-axis current controller but leaving the d-axis (phase) controller working. This gives the benefits of FOC (dynamically adjusted motor timing) but the simplicity of direct PWM control. In fact, this was what I used for the first few tests of FFv1.0. Here's some data showing it executing step "speed" commands:


At each step, the q-axis and d-axis current spike due to the inertia of the motor and prop. But, the back EMF brings the q-axis current back to a steady-state value as the prop speeds up or slows down, and the mSCR adds or subtracts from the phase to bring the d-axis current back to zero.

The benefits of direct PWM magnitude control are simplicity and robustness. With current limiting to prevent the spikes from damaging components, I think this could be a pretty good way to run a multirotor controller. It's how most ESCs operate, so it would feel normal. But, it has several downsides:

  1. It can't achieve minimum rise time. The step in voltage magnitude will give only as much current as the motor resistance will allow. A smarter controller could slew the motor faster using a voltage that is higher than the steady-state value at the target speed.

  2. It can't accommodate minor difference in motors/ESCs/props. If one motor is slightly weaker than the others, it will spin slower under PWM magnitude control. The master attitude controller's integral term can correct for this, but why rely on this?

  3. Motor speed is only roughly proportional to applied voltage. The actual speed depends on the back EMF, which is V-IR. At higher loads, the speed per applied volt is lower. Does this matter? Maybe not, since none of this is linearly proportional to thrust anyway.
A classical approach to true speed control would be to wrap an outer PID control loop around everything:


The speed control loop, a generic PID with saturation, feeds the q-axis current reference a value between the maximum braking current and the maximum accelerating current, depending on the speed error. The d-axis controller is still simply trying to maximized torque per amp by adjusting motor phase. (The more I think about it, the more the mSCR strategy makes sense in this regard.)

This video shows the start-up and PID-based speed control for FFv1.0 with the 14x4.7SF props:


The nice thing about PID control is that it's easy to understand and easy to tune. Unfortunately, the load in this case is very nonlinear. As the speed increases, the damping due to propeller drag goes up. So, the step response changes depending on the speed:

Real data from the 14x4.7SF prop.
From 1,000-2,000rpm, the chosen gains exhibit a lot of overshoot. From 4,000-5,000rpm, they're overdamped. With this data as a starting point, I made a quick simulation including the nonlinear prop load. Another nice thing about PID is that it's very easy to work with in a Simulink:

This is what grad students do all day.
After some shady parameter estimation, I could almost predict the step response shapes:


The real-life response is actually a bit faster than the simulated response, for some reason. Not going to complain about that. But, they're both pretty slow overall. The motors never reach peak current during speed steps. The slew rate can and should be much faster for the best possible speed command tracking. By tweaking the gains in Simulink, I can now get a feel for which way they should be pushed in real life to speed up the response and kill off some overshoot.

I also think there's a better way. This post is already quite long so I'll have to save that for next time, but there is a hint of it in the Simulink diagram...

For now, I leave you with a Kramnikopter that I bought for basically nothing and will be doing absolutely zero custom development for:

Yay, not-complicated flying things.

Sunday, April 1, 2012

TI Workshop + The Joys? of High-Speed Motor Control

I spent the past week at the Texas Instruments C2000 MCU Real-Time Industrial Control Training in Waltham, MA. It was really good workshop that I would highly recommend for anyone who wants to get into real time motor control. The next events are in Michigan and Wisconsin in May and June. The three-day event covers control theory on day 1, motor control specifics on day 2, and a C28x microcontroller intro on day 3, for which you get an F28069 Piccolo controlSTICK to keep:


In the interest of fair reporting, I will say the that feature set of the TMS320F28069 microcontroller does give it a few advantages over the STM32F103C4 that I currently use. It's a 32-bit processor (not ARM based) and can run at up to 80MHz. But, it has a built-in FPU and control-law accelerator, something not found until the F4 line of the STM32s. It also has more PWMs (16) and ADCs (16) than the smaller STM32F1s. As far as the available IDEs, I've used both IAR EW and Code Composer Studio before and I find them to be equally annoying. And I hate JTAG/emulated debugging anyway. 

I don't see myself switching away from the STM32, but I've had good experiences with the TI MSP430 line and I wouldn't hesitate to recommend those or the more powerful C2000's for people looking to escape from Arduinoland.

Since I'm always talking about how convenient it is to have a compact electric scooter that folds so you can take it on public transportation, I decided to try it out on my way out to Waltham. The bus from near me stops just on the other side of Prospect Hill Park from the TI offices:

No problem. This should be a nice traffic-free scooter ride through the pa-  
Oh.
I guess I neglected to consider the fact that Prospect Hill Park might actually be named for its predominant topographical feature. Pneu scooter is good at a lot of things, but hills are not one of them.

So I guess I'll be hiking.
Also, some of the paths are just dirt trails. The good news is that that's the TI parking lot right there.
Well at least I could have a fast trip down the hill on the way home - Oh no wait, it tore my brakes apart on the first two days. By the third day, with repaired brakes, I had pretty well optimized energy usage so that I could minimize hiking up the hill and coast the entire way down. Still better than driving in Boston rush-hour traffic.

Anyway, although all three days of workshop were great, I was especially interested in Dave (Wisconsin) Wilson's Motor Control Seminar. Most of the slides are available on his blog if you are interested. I learned a bit more about TI's InstaSPIN BLDC control scheme, and am beginning to sort out the various types of sensorless control methods.


One thing I picked up which I have to think more about is that what I have previously referred to as an open-loop flux estimator is in fact not as far different from a closed-loop observer as I had thought. The difference is more subtle and possibly less fundamental than it seems. For example, here is a closed-loop single-phase back EMF/current observer with a PI compensator:


With just one page of math, I can unwrap the feedback loop and rewrite it in the form of my "open loop" flux estimator, plus an additional low-pass filter. The closed-loop form still has the advantage of keeping an internal state for current estimate, which is probably way cleaner than the measured current. But they're not fundamentally different as I had once thought. Go figure... 

Maybe the important distinction then isn't between open-loop and closed-loop formulation for the observer. Maybe the fundamental difference is between observers that work only on electrical quantities and ones that include a mechanical state (speed, position). The addition of a mechanical state would almost certainly improve the performance of either observer, since it would anticipate the trajectory of I and E as the motor rotates. No wonder this is the type of observer described in the Book of Mevey, which has been right about everything else so far.

Back to reality.

My immediate task is to get this thing spinning:


After realizing that I wouldn't be able to hear anyone coming over the noise of the propeller, I added this:


In the previous post, I had gotten FFv1.0 up and running using Pneu Scooter as a test motor. The TI DRV8301 gate driver/everything chip performs well. But, the first time I attempted to run the motors on the hexrotor, I ran up against some not entirely unexpected issues with high speed control. At full speed, the electrical frequency of these motors can be 1,000Hz or higher. Every part of the control loop from the currrent sensors to the digital filters has to keep up with this, and in fact exceed it by a large margin to minimize phase lag. This is a tall order with a 15.625kHz PWM-limited control loop.

What I found on the first attempt is that at high speeds, the flux estimate becomes noisy and its zero-crossings, which are used to mimic Hall effect sensor transitions in my sensorless method, become blurry and unreliable. As a result, the position estimate would become noisy, which would lead to incorrect voltage vector placement. This leads to even more noisy current which leads to an even more noisy flux estimate, and so on. The physical result would be a motor that sounded very unhappy and current measurements that are all over the place starting at just under 5,000rpm. Under load, it could lose sync and crash entirely, surviving only because it was running on a current-limited power supply.

As an attempt to remedy the problem, I'm trying an idea I first thought of a long time ago for use with Hall effect sensor-based field-oriented control. The algorithm already uses a time-based interpolator to work between one flux zero crossing (or Hall effect transition) and the next. Instead of trusting the new zero crossing's position estimate 100% of the time, it's possible to use an IIR-style filter to merge the interpolator with the new position. Maybe this will help:

Maybe.
When the new flux zero crossing or Hall effect sensor transition comes in, it generate an angle (blue) which previously would be taken as the true angle. Now, that blue angle is averaged with the current estimate based on time interpolation (brown) to create the new estimate (purple). The relative degree of weighting for the average is set by a parameter, A, just like and IIR filter.

At high speed, when the blue vector is popping up at the wrong time due to noise, this filter will help stabilize the rotor angle estimate. And what a difference it made, without any tuning whatsoever. Here's some video of spinning up the larger prop, a 14x4.7SF:


One interesting thing is that I haven't even written a startup routine yet, but most of the times it starts just fine. I guess I'm used to vehicle controllers where if you don't write a startup routine they just sit there and buzz angrily. Also interesting is that once it does start, it can run at as low as 370rpm, which is about 7.5% of the top speed. So that would be my target speed for exiting the startup routine and entering run mode.

I can tell from the data that the angle filter helped a lot - the current is much cleaner. Here's a plot of the flux and phase currents with respect to the estimated angle:


Things are mostly in the right place and the flux estimate has the correct magnitude. (The flux is related to the motor constant or the rpm/V constant.) Something fishy is going on with the phase of the flux estimate. Its peak should stay right on 180º, since that's being used to define the d-axis. But instead it starts to shift forward at high speeds. As it turns out, I messed up the filter code a bit, so I'll have to go back and fix this one later.

For now, I also did some benchmarking against a Turnigy Sentilon 100A HV, a very good brushless motor controller. I measured (using a clamp multimeter) the AC RMS phase current and the DC bus current at different speeds running with the Sentilon 100A HV and with FFv1.0:


The not-very-interesting result is that they pretty much overlap so far. So I am at least not doing worse then good-but-dumb brushless DC controllers. It's definitely possible that any advantage of FOC will be lost in these motors because they are so efficient in BLDC mode already. Typically, high-speed low-inductance motors can operate very well with square wave drive. 

But there are other advantages that I'm still counting on. One which I was reminded of accidentally is that this controller can do four-quadrant drive. It can, in fact, brake so hard that it can unscrew the prop adapter and send a propeller flying across the room. Having braking should improve the response time of the motors to negative speed steps, which can help the control be snappier.

I've only just barely scratched the surface of the number of parameters that can be tuned. My next task will be to explore the effects of changes to the various motor parameter estimates, the filters, and the limits. Then, to see how it responds to more dynamic inputs. Then collapse everything into a simple enough interface that it could be used by other people. But so far, it's been a relatively problem-free controller build for once...

Friday, March 23, 2012

FF v1.0: First Spin-Up

Actually first, a little bit of micro quadrotor: I modified the timing of the TB6588FG motor control ICs on 4pcb. They were initially set by me to 0º (neutral) timing and I never thought about it after that. But since I discovered that command saturation on one motor is the cause of instability at low battery voltages, I thought I would give the timing adjustment a try. The theory: with advanced timing, the motor will generally spin faster for a given voltage command. The average command required to hover will be lower, so the margin left for control will be increased.

I ran it with 15º and 30º timing, flying from a full battery until it became too difficult to keep in the air (typically around 3-5 minutes). The average command did in fact decrease with advanced timing, although not by much:


Experimentally, the 15º setting seemed to be the best of the three. The 30º may have had more command margin for control, but it had shorter flight time, possibly because it uses too much current. The real solution might be to use a 3S/370mAh battery instead of the 2S/460mAh, since the TB6588FG would actually prefer more voltage and it would give lots of command margin.

Okay, I'm putting the micro PCB quadrotor away again, I swear. (I'll have to build a pico PCB quadrotor soon to keep up with the miniaturization trend.)

My FF v1.0 compact motor controller boards are in. It's the smallest (physically) motor controller I've attempted to build so far, with a footprint of 3.0"x1.5". Unlike my vehicle controllers, it's also designed to run without a heat sink, so it can be heat shrunk and buried inside of something.


The size and placement of the DC bus capacitors in this version is not ideal. I would prefer to have one or two long electrolytic capacitors sticking out the side in the direction of the wires, then maybe an array of ceramic ones mounted on the board. With that configuration, it would be only as thick as two sides of FETs. The XBee is an optional add-on that can be used for wireless programming, data acquisition, or radio control. Otherwise, it will have headers for PWM or serial-based control sticking out from the side opposite the power wires.

The most critical thing to test on this new controller is the Texas Instruments DRV8301 three-phase gate driver / dual current shunt amplifier / auxiliary buck converter controller / washer / dryer / smartphone / multi-tool. After a small amount of messing around with SPI code (the DRV8301 is configured by SPI, whereas the DRV8302 has hard-wired resistors for changing settings), I was able to get the gate drivers running. I had accidentally specified an insufficient amount of gate drive power supply capacitance, on the GVDD pin of the DRV8301, so I initially got a flood of GVDD undervoltage faults. After bumping it up to a 4.7μF, 16V 0603 (those exist?) I got much better results:

High side (top) and low side (bottom) gate drive waveforms.
High side turn-on and low side turn-off.
High side turn-off and low side turn-on.
GVDD ripple during low side turn-on.
First observation: Yes, I am using a new Tektronix DSO. It's...idk, I miss using the analog one. But this one can save images directly to a USB stick. The future is now.

The turn-on and turn-off times look appropriate for a 2A-peak gate driver on an IRFS3004-7 monsterFET. I get the impression reading the DRV8301 datasheet that this is slightly beyond the scale of FETs this chip was designed to drive. But it seems to handle it okay with the scaled-up GVDD and bootstrap capacitors. The last image is the GVDD ripple when all three low side FETs turn on simultaneously (also allowing the bootstrap caps to simultanously recharge). With the 4.7μF GVDD capacitor, the voltage dips from 11.5V to about 10V. The unvervoltage fault kicks in at 8V, so I think I'm still okay.

My shady math indicates that with these turn-on / turn-off times, the switching losses should be about 20W at 15.625kHz, 25V, and 50A RMS. Add to that about another 10W of conduction losses and the total dissipation at peak current would be 30W. I'm counting on the heat sinking of the wires, which I have no good way to quantify, so I'll have to wait and see if this is an acceptable amount of dissipation. It's also entirely possible that the whole thing freaks out due to noise way before 50A RMS.

So far, I've ported the code over from 3ph v3.1 (Pneu Scooter's present controller) to FF v1.0 for testing. Since I had already switched it to synchronous current sampling and sensorless control, the only real modifications required were changing around some pin definitions and adding the SPI configuration routine. After fidgeting for a few minutes with current sensor polarities, it now spins Pneu Scooter's motor the way it should:


And it is running entirely sensorless, using the same flux estimator as 3ph v3.1. One really interesting discovery is that it produces a nearly identical flux estimate vs. angle plot:

From 3ph v3.1.
From FF v1.0.
I'm not surprised that the flux estimate has the same magnitude and general shape, since it is the same motor. What's surprising is that the irregularities are the same. There's a break at about 200º that I have yet to find a good explanation for. Also, there are sections that are cleaner than others. I thought this might be due to differences in the current sensors or something, but this is entirely new hardware so now I am wondering if it's a software issue. I'll have to replicate the same plot for the other two phases to see if there are more clues to this mystery.

But why am I testing it on a scooter? I want to use it on a giant hexrotor. So far, all of my sensorless testing has been done on a 14-pole motor that maxes out at about 1,500rpm, so about 175Hz. Now, I need to run it at 10,000rpm with the same pole count. 1,168Hz commutation with a 15.625kHz switching controller is going to be a real challenge. So for the next short while I will be attempting to modify the software for high speed operation, and then testing it side-by-side against a commercial controller on some high-RPM brushless outrunners.

Once it's undergone sufficient load testing that I am convinced it won't just blow up, I will post the design files.

Next week I will be attending the Texas Instruments C2000 MCU Real-Time Industrial Control Training in Waltham, MA, where I will likely be ridiculed for using ST microcontrollers with TI gate drivers. In any case, I will hopefully learn some more motor control tips and tricks from the experts, including Dave (Wisconsin) Wilson from the TI Motorblog. I first found this blog when he posted the Ten Commandments of Digital [Motor] Control (Part 1 2 3 4 5), which is a must-read for anyone who wants to do motor magic. I'll likely make a summary post after the workshop concludes on Thursday.