Thursday, August 29, 2013

Yes, yes I do need more flying things.

My fleet of flying things has grown quite a bit over the last few months, and I'm not just referring to Kerbal ships. First off, a little pocket quad!


This is the HobbyKing Pocket Quad, a tiny < 30g single-PCB quadrotor that comes ready to bind to a Spektrum transmitter. (Well, first you had to glue the motors in place with hot glue, and then discover that the entire craft vibrates like crazy unless you glue them much lower in the booms than the product images indicate.) The newer model (v1.1) comes with plastic motor mounts, which is nice. And it really is a pocket quad, no joking:

Well, maybe time for cargo pants...
Having built a single-PCB miniature quadrotor, I know how tough they are to make stable compared to their big counterparts. The propeller slew rates and sensor bandwidth required to keep up with the fast mechanical time constant of a miniature/micro quad are hard to achieve even in a completely rigid system. Throw in nasty mechanical resonance excited by high RPM motors and you get a controls nightmare.

This quad is so small that I feel like quantum mechanics might be coming in to play as well. The heart of the control system is a MultiWii-compatible sensor suite (MPU-6050 flavor) and ATmega32u4. So, you can tune it using the MultiWii GUI which is well known and easy to use. It has directly-controlled brushed motors, so there's no problem of slow brushless ESCs to deal with.

And, oh yes, important point: it does fly.
Out of the box (actually, it came in a static bag), it's not quite as graceful as a Walkera Ladybird. But that could be mostly due to the less-than-ideal motor mounting in the v1.0 frame that I got. Or it could be that it requires a bit of MultiWii fine-tuning. Since I recall one of the very first almost unbelievably stable nano quadrotors was based on MultiWii, I'm not surprised this one is also pretty easy to fly.

Speaking of MultiWii, I still have one laying around that I used to write some dirt-simple attitude estimation code. The ultimate goal is to create a flight controller out of less than 500 lines of code .(It's Arduino C code, so the 500 line limit assumes some libraries to take care of low-level things like I2C reading.) The point isn't to improve on the MultiWii control code, just to strip down quadrotor flight control to its absolute simplest functional form. Something to bridge the gap between control theory and actual, readable C code that people can understand without digging through abstracted libraries.

Anyway, such a project, if it does pan out, will require a new airframe. Actually, that's a complete lie and I just wanted a new airframe.


This is a size I have yet to play with - an F330. (Thanks for the frame, DGonz.) It's a good bit smaller than the Talon, which is probably a good thing for testing a completely custom flight controller. I have a hunch that it's actually a really good size for a GoPro-carrying quad...if you can work out the vibration isolation problem that plagues small GoPro quads. Anyway, even if it proves useless for GoProing, it will make a nice test frame that is essentially free.

The motors are Turnigy Air L2210C-1200's, also from HobbyKing. On one hand, they are well-built, have extremely low cogging, and good Kv/resistance combination for their size. On the other hand, they suffer from the axial play issue that makes small outrunners awful. (The rotor can is not axially preloaded, so it loosens slightly and then makes a ratcheting noise as it moves due to magnetic forces.) 

And on the third hand that you didn't even know you have, the prop adapters are terrible. They are extremely tall, which makes them almost useless for quads for the same reason that gluing the motors in the Pocket Quad as they are pictured in the product image is awful. Having the props so far away from the boom is a recipe for vibration, since any imbalance now has a huge moment arm for twisting the boom. I have attempted to modify them as much as possible to get the props down closer to the booms, but it might be hopeless. Maybe time to try out some different options.

One thing that was very helpful on this build was the 4-way XT60 to 3.5mm bullet splitter.
For ESCs, I used the same FFv1.2s's that have served me well on the Talon for quite a while now. They're a little big for this size frame, but I managed to fit them in sideways in a way that doesn't seem too inefficient.

And some lighting.
And until I create my mythical sub-500 line flight controller, it'll use a KK2 running the latest firmware (v1.6), which is pretty solid. Blah blah Stability blah GPS blah...it's less than $30, it has an LCD on board for tuning, it reliably arms and disarms on command, and I thoroughly understand the control code at work inside of it (because I can go read it myself), which makes me actually trust it. Maybe to people who treat every flight controller as a magic black box the perception of value and reliability is very different...

Oh, I forgot one other important reason why I wanted an F330: It fits in a backpack. This had only hypothetical benefit to me until the day after I completed this quad and went on my very first West-coast hiking trip with high-mountain-and-high-voltage-loving Tyler, as well as some other timezone-shifted MIT people. We went on a "tame" (Tyler's definition, not mine) hike up to Pratt Lake. I asked if there would be some flat, open area around the lake from which to take off and land.

"Yes."
I did find one rock with a flat enough top to take off and land from on the 30º rock slope. The picture above is actually from the quad's GoPro just before returning to my little landing pad rock. Unfortunately the video itself is not very pretty at this point due to the wonderful world of CMOS and vibrations. But the stills were worth the quick test flight.

A view of the lake from about 75-100ft up. Yes, I could have simple climbed back up the rock slope to get virtually the same picture. But dammit this is the future and there must be flying robots involved.
Spying on the rest of wilderness-MITERS (label stolen from Amy) from behind a tree.
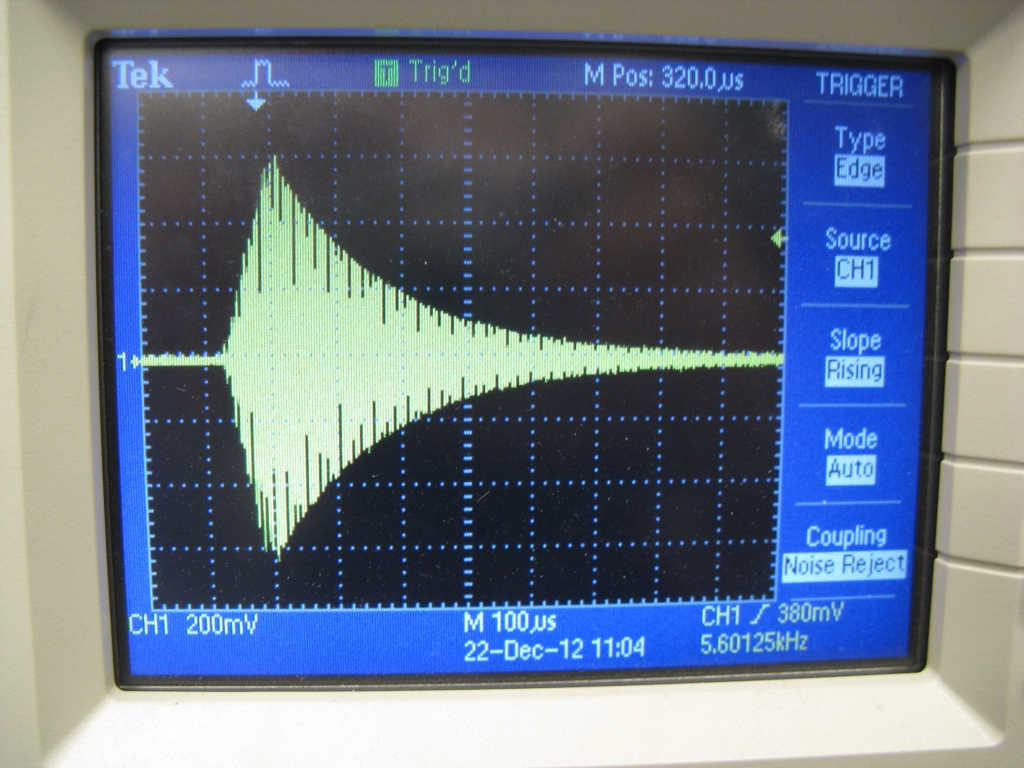
So the next step for the F330 project is to travel down the wonderful road of vibration minimization and isolation. Precision propeller balancing, custom prop adapter turning, motor replacement, motor balancing, and silicone/memory foam padding are all stops I might visit along this path. Finding the magic combination to mechanically filter the prop vibrations (~50-100Hz in this case) is an annoying but straightforward task. In addition to making the video more tolerable, it will reduce gyro noise at that frequency, which should simplify the control task a lot.

There's one last new addition to the fleet. This one is also small and from HobbyKing, but it only has one rotor (gasp).

Well, two rotors actually.
It's a Turnigy FBL100, HobbyKing's counterpart to the Blade mCP X. These are nano-scale flybarless helicopters, which are such a giant leap from the counter-rotating-blade mall toys from not that long ago that I had to have one. I've never flown a collective-pitch RC helicopter before, so I figured this would be a good way to start learning. The trick is is that the blade pitch can be negative, meaning you can fly inverted and do other crazy RC helicopter things. And by "you" I mean not me. 

But it was easy enough out of the box for me to simply hover. It has active 3-axis electronic stabilization (in lieu of a flybar) using three very tiny and very cool linear servos controlling a CCPM swash plate, as well as a feedback-controlled tail rotor. That used to be a lot of controls to fit in a tiny package, but not anymore, this is the future. I do wish I could tweak the controls and the pitch/throttle curves. (You can do the latter, if you buy the transmitter module for use with your own radio instead of using the stock included transmitter.) But even with just stock setup it's fun.

And then you add a strobe light and it becomes 10x more fun (and ~3x more difficult to fly):

Monday, June 17, 2013

KSP: Interplanetary Transport Ships I & II

Kerbal Space Program is my new favorite game, at least until Gran Turismo 6 comes out in the Fall. If you haven't tried it out yet, you should do so. (But only if you have many hours to spare while you discover just how hard it is to even get into orbit.)

Having gotten the hang of landing on Kerbin's moon (Mun) and return, I decided to move on to bigger and better things and build an interplanetary ship back in version 0.18 of the game. (It's still in development, so v1.0 is yet to be released.) The actual propulsive requirement for an interplanetary ship is not unreasonable, given the available parts, and Kerbals don't really care about other resources like water, food, and time. (Radiation shielding? Not important. They're already green.)

I speculated that the first Interplanetary Transport Ship could, with a Kerbin Orbit Rendezvous flight plan, make a trip to Duna, the Kerbol equivalent of Mars, and back. The trick is to dock two ships in low Kerbin orbit, transfer fuel to one, and then use whatever fuel is remaining in the second ship to boost two-ship combo towards deep space, into a highly-elliptical orbit of Kerbin.


The second ship then turns around and returns to Kerbin (using almost no fuel) while the fully-fueled ship continues to burn past Kerbin escape velocity and onto an interplanetary transfer orbit. It's very efficient, assuming you've timed your transfer correctly, leaving you with a nearly-full ship on the way to another planet, in this case Duna:

My method for timing the transfer was to print and cut out a paper triangle and wait for the planets to line up on the edges...
Another necessary technique for interplanetary travel is aerobraking: using the atmosphere of a planet (or moon) to slow you down, instead of rockets and fuel. It's a pretty complicated aerodynamics problem to figure out how deep into the atmosphere to go to reduce your speed by a desired amount. One option is to take multiple shallow passes, reducing your speed little by little, orbit by orbit. But what if you are attempting aerocapture: braking enough to be captured from a hyperbolic escape trajectory into a planet's orbit. There, you get only one chance. Too much and you are crashing to the surface. Too little and you are skipping back off into space.

Arriving at Duna on a hyperbolic flyby trajectory...set up for an aerocapture.
It turns out that there's some relatively simple calculating that one can do using only parameters readily available in KSP. I found this in a paper and presentation on aerobraking from an academic conference. There's still a lot of maths involved, but I arranged the important equations into a simple spreadsheet. Enter the current orbital data (speed and altitude) and the aerobraking altitude at periapsis (closest approach) for a particular body, and it will calculate the exit orbit. But does it work?

AAAAAAAAAAAHHHHHHHHHHHHH!
Aaaand capture.
After trying it out a few times on Duna and Kerbin, I can say for sure that that formula works. If you use the pre-aerobraking periapsis, the output orbit will be somewhat less energetic than predicted (lower apoapsis), but I think this is mostly due to the slight reduction in periapsis that occurs at the front end of the aerobraking pass. If you use the true periapsis from the middle of the pass, the result should be even more accurate. Of course, that's not useful for mission planning, so a more practical tip is just to leave some margin for error by targeting a higher exit orbit than you really want. 

The simple formula works for hyperbolic escape trajectories as well (possibly even better than for elliptical orbits, since the predicted periapsis is not going to change much when you enter the atmosphere on such an energetic, straight-line path). So, for aerocapture it's a very useful tool. Something from real-world rocket science is actually applicable to KSP! That was probably the most exciting KSP discovery for me yet. And it allowed me to get to low Duna orbit with essentially a full tank remaining.

Getting down to the surface of Duna is, without a doubt, the hard part.

As the Mars analog in KSP, Duna presents the same challenges to its potential landers as the real thing. The atmosphere is thick enough to permit the use of aerobraking and parachutes, but too thin to land on chutes alone, especially with the mass of a fully-fueled interplanetary ship coming down. I forgot that I had put four large parachutes on the ship for exactly the purpose of slowing it down, so I opted instead for a terrifying completely-powered descent on rockets. (Same as landing on Mun, but with much more gravity.) It was so terrifying, in fact, that I really didn't have time for screenshots on the way down. But here's the massive craft, landed safely on a slight incline:


The deorbit and powered descent took, in total, 2,059m/s of delta-v (the most convenient metric of propulsive effort, since it is independent of the mass of a craft). Though it didn't exist at the time, the official delta-v map of the Kerbol System suggest an ideal Duna landing from low orbit can be done on about 1,380m/s of delta-v, which I believe, since my landing was far from ideal. The ascent was much better, clocking in at 1,532m/s, plus an additional 110m/s for inclination adjustment to get in plane with Kebin's orbit for the trip home.

All tallied up, the round-trip mission from Kerbin orbit to Duna surface and back racked up 5,576m/s of delta-v from the primary ship and an additional 928m/s boost from the Kerbin Orbit Rendezvous ship. Had I used the ship as originally planned (staging all four side tanks and LV-N engines at the same time), the available delta-v would have been 5,685m/s, still enough to make the trip, but just barely. Mid-trip, I decided on the more efficient method of dropping two tanks at a time, reducing the weight of the remaining ship and extending the range a bit. But that gave me an idea for an even more capable ship, which I have now built...

Interplanetary Transport Ship 2

You'll also note the change in aspect ratio, indicating I can finally run KSP on full 1920x1080 on my new laptop!
This ship is built in v0.20 of the game, which has several new additions such as solar panels, new engines, and reentry effects (visual only, for now).

It's almost the same ship, and the launch booster is in fact identical, but there are subtle differences to the transport ship (what you see above) that make it much more capable than the last. The main difference is that two of the LV-N nuclear engines have been swapped out for LV-T30 liquid fuel engines. (Both engines use liquid fuel...the LV-N is much more efficient but also has much lower thrust.) This opens up the possibility of high-thrust ascent. The ship can even, just barely, lift off from Kerbin. (It would not be able to reach orbit, I don't think.) More interestingly, it has a comfortable thrust margin for lifting off from Laythe, the only other inhabitable body in the Kerbol system. Yes, this ship is designed for a round-trip mission to Laythe, just as the last was designed for a mission to Duna.

A Laythe mission would require very careful planning, and mostly likely both Kerbin and Laythe Orbit Rendezvous for refueling. (A total of three ships? Maybe even more.) And a completely powered descent to Laythe is pretty much out of the question - it will have to be parachute-aided. This is difficult since there isn't much land to target on the watery Kerbin-sized moon. However there's no fuel to waste tweaking the entry; almost an entire full tank of fuel is required for Laythe ascent, I think. It will be much, much harder than the Duna mission, but I think a relay team of these ships is capable of pulling it off, now that the problem of Laythe ascent stage has been solved by swapping two engines for ones with more thrust.

The beauty of the swap is that it doesn't hurt the efficiency of interplanetary burns at all. Two LV-Ns are just as fuel-efficient as four. The burns are just twice as long. Furthermore, the shorter LV-T30 engines leave enough room for some small fuel tanks. So although the ship is 3.9% heavier at launch than its predecessor, it carries 6.3% more fuel. A larger ratio of fuel to non-fuel means more delta-v. If used entirely for interplanetary burns (no atmospheric burns), and if the two empty tanks are dropped when they run dry, the available delta-v from the LV-Ns is 7,346m/s! Looking at the master map again, that's enough to go almost anywhere...


The mission outline might be something like this:
  1. Two ITS2 ships dock in low Kerbin orbit. One is maxed out on fuel. The other is used to boost the first into a Jool transfer orbit, or as close as possible to one. (The primary ship can finish off the transfer burn.) The boost ship returns to Kerbin.
  2. The first ship to Jool aerobrakes into an orbit that intersects that of Laythe. (Basically recreating this scene from 2010.) It then aerocaptures into Laythe orbit. All using minimal fuel.
  3. Repeat steps 1 and 2. A second ship is now in Laythe orbit. The two execute a first Laythe orbit rendezvous. The lander ship (either of the two) is refueled.
  4. Lander ship decouples and deorbits, landing on Laythe with the aid of parachutes. This is the trickiest operation, since there is very little land mass to aim for and almost no fuel can be wasted for tweaking the descent. Only a small burn at the end to slow the craft to landing speeds should be necessary.
  5. Lander ascends, using most of its fuel to get into Laythe orbit and re-rendezvous with the orbiting ship.
  6. The two ships return to Kerbin together, possibly first diving towards Jool to build up speed for a transfer burn? If this isn't possible, all crew and fuel would have to be transferred to one ship for the return. (Each ship is partially-crewed at the start for this option?)
It's a bit sketchy, but none of it seems impossible with the new ship. As long as it can get off of Laythe, the rest comes down to refueling waypoints. Before I take on the challenge, though, a few shakedown tests of the new ship:
A quick trip to Mun...
And my first landing on Minimus.
Did you know that it's possible to orbit a Kerbal on Minimus using jetpack propulsion? Deorbit did not go as well...
A test mission to the Joolian system, into Laythe orbit, and back is also in order to get a feel for transfer burn delta-v, aerobraking heights, and the best return path. (Dive towards Jool or direct from Lathe? My hunch is diving is much better.) I may also attempt to make some accessories to take. (Rover? Habitation module? Unmanned probes for testing Laythe descent trajectories?) For now, though, the primary ship looks solid and ready. Here are some specs:

Interplanetary Transport Ship II (ITS2)
Crew: 3
Empty Mass: 25.93t
Fuel Capacity: 34.00t
Full Mass: 59.93t

Engines: 2x LV-N, 2x LV-T30, 1x Rockomax "Poodle"

Maximum Thrust: 770kN (78.52t) 
Maximum Full Acceleration: 1.310g
Maximum Empty Acceleration: 3.028g

Range (Lander Configuration): ~5,340m/s
Range (Interplanetary Configuration): ~7,350m/s

Wednesday, April 24, 2013

NAB 2013: Where are the gyros? / New video editing software.

A couple weeks ago I was at the NAB Show with Freefly for the MōVI launch, the first product I've helped work on at the new job. That meant spending a lot of time doing the chicken head dance and explaining to people that there aren't actually spinning flywheel gyros on things anymore...


It's a camera gimbal, similar to what would be mounted to a helicopter or multirotor, that you can also carry around in your hands while it stabilizes the camera. (If you read this blog, I'm sure you know all about control systems and active stabilization so this probably doesn't amaze you as much as it still amazes the non-technical public...)

Since I spent nine hours a day at the booth talking to people about gyros (Wait, is this Maker Faire all over again?), I didn't get as much time as I would have liked to wander around this expansive tradeshow, which covered three whole buildings. (It's about 10x the size of the EVER Monaco Expo / car show I've been to a couple times.) There were definitely a lot of camera-carrying multirotors this year.

Here is just one of many....
I was mostly impressed by how it folded up.
There was also a giant two-story indoor flying tube where DJI showed off some of their products. And several outdoor booths with all manner of flying cameras ranging from GoPros up to big-budget cinema cameras like the RED Epic. Speaking of RED, they had a clean room installed on the show floor where they were doing live sensor upgrades to their new 6K / 100fps sensor. (So to watch the video it produces, you need nine HD screens in a 3x3 grid and it has to play in 4x slow motion...)

Most of the camera stuff at NAB is way outside my budget, but one thing that excited me was the Blackmagic Pocket Cinema Camera, which was also just announced at the show. It shoots raw or high bit-rate compressed 1080p video onto normal (but expensive/fast) SD cards. If I were planning to upgrade from my Panasonic HD camcorder in the near future, the $995 price is not that bad. The only real problem for me is that it weighs 355g, (maybe less than 500g with a small lens?), so I would be instantly tempted to put it on a multirotor, and then I would be at risk of crashing it all the time. I doubt it's as durable as my GoPro...

I think of all the NAB Show things I saw later read about on the internet, the one that caught my attention most was new, free-ish video editing software called Lightworks, by EditShare. I was pretty disappointed that the new Windows 7 edition of Windows Live Movie Maker is a stripped-down piece of crap, even compared to the at least somewhat functional WMM from the Windows XP era. (The old WMM had an active user community with lots of third-party add-ons for people who wanted to use it as an actual tool.) So a new piece of editing software that doesn't cost hundreds or thousands of dollars was definitely something I wanted to try out. And it looks like a very nice tool.

Maybe I was attracted to Lightworks because the desktop layout is almost indistinguishable from that of a CAD program:


Which of these is the video editing software and which makes 3D models?
Despite being a relatively new program (I'm using the Windows beta version), the interface feels very smartly developed and intuitive. Combined with a set of quick-start video tutorials, I didn't have to spend much time at all to learn how to do simple things like make clips, arrange a timeline, trim ins and outs, work with audio tracks, and add simple effects like fades and dissolves. The options for moving a cut are particularly nice: you can make clips on either side of the cut longer or shorter independently or have one get longer and the other get shorter at the same time (to keep sync). Maybe this is a pretty standard feature in professional editing software, but it's my first time using it and I can't imagine how to ever work without it now.

The only part of the workflow that was not quick and easy was exporting video. Importing from various formats works great, but exporting to something other than a hardcore (and huge) editing format was a challenge for me. H.264 support is through Quicktime, maybe? The new beta version may support native H.264 without Quicktime but I failed to make that work. So in addition to buying the Pro version of the software, you have to also have Quicktime Pro to create H.264 files? And then after all that the H.264 output had no audio (a known bug). Luckily, you can export the audio track as a .WAV, so after fooling around for a few hours to get the H.264 export to work, I still had to use my trusty all-purpose MEncoder shell program to reattach the audio.

I'm sure the export quirks will be worked out in newer versions of Lightworks, though. If the software stays the same price ($60 for the Pro version with full codec support, including H.264?), then it's an amazing deal for a real editing tool.

To test out the software, I've finally gotten around to collecting up all my random GoPro clips from around MIT, flying with my Talon quad. No fancy stabilized 3-axis gimbal for me (well, no gimbal at all...just taped to the bottom of the quad), so get ready for a rough ride:

Tuesday, March 26, 2013

Motor Dave is Back! (And so am I...mostly.)

I took a bit of a break from blogging to move across the country.


Loading up my cube during the coldest day of the year in Boston.
I escaped the Northeast right before the string of major snow storms and am now based in sunny Seattle at a company called Freefly Systems where I will be...doing pretty much the same thing I did in academia, over-engineer motor and control systems. I may occasionally re-post some cool videos from the job, but for the most part this blog will remain dedicated to my personal projects.

Some brief updates:

My custom-built glass table survived the trip, somehow:

The right angle joints rotate up to protect the corners of the glass. I totally designed it this way...
Pro-level ratchet strapping.
And I finally have enough room to put all four chairs around it!
If you ever find yourself needing to move a 100lb slab of glass across the country, let me know and I'll give you some tips.

I now own a car:

It's a bit wet in Seattle, actually....
If you don't believe me, figure out what this is a picture of.
Well, I own some fraction of a car...maybe 25%? More than I used to, anyway. Unlike Boston, It's pretty much a requirement for getting around. I haven't owned a car since high school and the car I had back then was worth less than my computer, so I'm glad to finally have something (hopefully) reliable and fun.

My Tesla coil in now only 3-4 orders of magnitude less impressive than a oneTesla:


I intentionally did not ship my coil with the rest of my possessions because I wanted to work on it a bit more before I left. (I promised Clare Fairchild that it would make some form of sparks before I left.) All systems seem to be working as expected up to this test which was at 48V DC input, so still low power. I carefully wrapped and shipped the coil separately so that I can continue to work on it here, when I get the chance, tuning it and turning the power up so that it can break out on its own. Once I get some respectable arcs, I will take another stab at writing a MIDI parser so it can play music.

tinyKart is a wreck, but it's getting a complete overhaul:

What
the
fuck 
happened
here?
Pretty much every part is covered two years worth of dirt deposited by snow and rain, including the most recent stretch of endurance laps run during a severe downpour at Maker Faire NY. Besides that, the damage report consists of: both pulleys and motor shafts (destroyed), one drive belt (destroyed), two spindles (bent), one brake mount (bent), both chassis plates (bent), and at least one full set of tires. Basically, the whole thing needs to be taken apart, cleaned, and fixed. However, that gives me the chance to do something I've wanted to do for a while: paint it.

Multirotor-assisted primer drying. Very effective.
It's done a lot more than we originally thought it would, so a bit of maintenance is definitely in order. It might take a bit of time to get it all back together properly, but when it is, it will look much better than it ever has, I think.

Lastly, Motor Dave is back! Dave Wilson, "Motion Products Evangelist" at Texas Instruments, has returned to the bloggernet as well with a new series on how to tune your PI controller, starting with Part I here. It's specific to the typical nested PI controllers involved in motor control (current, speed, position). If you haven't read his previous series, The Ten Commandments of Digital Control, you should. It starts here. I went to a TI workshop co-hosted by Dave about a year ago when TI's BLDC solution, InstaSPIN, was relatively new. At the time he hinted that there might be a future version: InstaSPIN FOC. Well, it's here now!

If you've been following my blog for a while, you probably have seen my many many posts of Field-Oriented Control, sensored and later sensorless implementations thereof. One thing I've not been very good with is putting out hardware that other people can easily access and play around with to try out this powerful motor control technique, without messing around with a lot of low-level code. (I like messing around with low-level code, but I can totally understand why most people hate that part.)

Anyway, you can now buy a kit for $300 that has enough power to drive a small electric vehicle motor and is loaded with a thorough FOC code library. Alternatively, you can just buy the control card with FOC library and develop your own high-power inverter stage. Or you can just buy the TMS320F28069 microcontroller with built-in FOC library and use it in your own hardware.

Though I haven't dug too deeply into the code, the basis for InstaSPIN FOC, and particularly the FAST observer, seems somewhat similar to the flux estimating structure I've used in my own sensorless routine. Flux is a nice quantity to observe, since it isn't speed-dependent like back EMF. The tricky part is keeping the observer happy at low speeds where not much rotor position information is available. InstaSPIN FOC seems to handle this situation using a "forced-angle" startup routine but then can also transition back through zero speed seemlessly when properly tuned.

I'm not sure it would cause me to deviate from making my own FOC software, but it's definitely something worth checking out. 

Thursday, January 24, 2013

DRSSTC Δt4: First (Tiny) Spark!


This post is a bit time-delayed, but a couple of weeks ago, after spending way too long designing and building my first Tesla coil, I finally put the whole system together for some low-power testing. After switching from wired USB control to XBee wireless, there seems to be no more serial port hang-up at primary currents greater than 40A. So I can control the driving frequency, pulse length, and pulse duty cycle (including ramping) from my laptop. This should prove to be very useful for tuning the coil.

The supply voltage in the video is 30V and the maximum duty cycle is 50%. Driving frequency was 155kHz, which was experimentally determined to be the primary resonant frequency. I think the pulse length was ~15 pulses. Using a long insulated stick with secondary ground connection on the end, I drew small arcs out of the breakout point just to confirm that I was in fact getting high voltage. Nothing has been tuned yet, so the spark is very small. But yay, sparks!

I think the secondary resonant frequency is significantly lower, so I will adjust both the primary coil tap (to increase inductance, add more turns or fractions of a turn) and the driving frequency to attempt to get better amplification. The goal isn't to match the frequencies exactly, but rather to get them separated by the right amount to achieve good energy transfer during one pulse sequence of N cycles. For practical purposes, I can just tweak the tap point and drive frequency to get the best arc length at a given pulse length or maximum drive current.

Once it's tuned well at low power, I will incrementally add more voltage. :P

Tuesday, January 1, 2013

DRSSTC Δt3: Driver Testing

To start with, the MITERS-originated oneTesla Kickstarter is now up (and already funded!), so you can now buy your very own musical Tesla coil kit. It's pretty amazing: up to 23" sparks from a 10" coil using regular old TO-X IGBTs. And the custom MIDI interrupter can play up to two MIDI notes at the same time.

Anyway, work has been progressing on my Dual-Resonant Solid-State Tesla Coil. I finished most of the mechanical construction in Δt1 and Δt2, so that mostly left soldering and testing of the driving electronics. The power electronics comprise a MOSFET H-bridge, using just one IRFP4668 and one APT100S20B Schottky diode per leg (with the option to add a second FET per leg for higher power). This, combined with 2000uF of electrolytic bus capacitor and the ACNW3190 optically-isolated gate drivers form the power board, which rests on a large heat sink directly below the coil.

I found 10ft of energy chain and bought 10ft of shielding from the last Swapfest for making a a long run of shielded cable to go from the power board to the signal board.


The cable has 15V power, ground, and four differential gate drive signals, each in a cable shielded with signal ground. The gate drive signals are relatively low-impedance, since they drive the opto gate drive LEDs. At least a few mA is required to change their state, so they should be relatively immune to EMI, compared to logic-level signals. However, it's still very, very necessary that the LED drive lines be tightly grouped and shielded. The outer shielding is connected to RF ground at the base of the coil, and is mostly there to protect against arc strikes on the cable assembly.

The whole thing coils up for clean storage.
On the signal end, a wootstick 2.0 running an STM32F103CBT6 at 72MHz provides the brains. I was finally able to get the ARM micro to run at full speed (72MHz in this case). Over a year ago when I was first venturing into sensorless motor control I ran into a mysterious problem that was limiting me to 56MHz. Turns out it was a flash memory access latency setting, explained on page 60 out of 1096 in The F-Ing Manual. In case anyone else is having the same problem (I doubt it, since almost everyone else uses the standard peripheral library), the missing line of code was just:

FLASH->ACR |= 2;

Anyway, having full 72MHz operation is nice because even though there isn't much processor-intensive control code, the frequencies and timing on the Tesla coil are much faster than those of the motor controller.


The switches and lights on the right side control and indicate various levels of arming the coil, including the 15V gate drive power supply, a precharge and a main relay, and the logic power supply. In order to isolate the microcontroller logic supply from the 15V gate drive supply, I use the DCR021205 that worked so well on my 3ph v3.1 motor controllers.

Next up, my favorite part: testing gate drivers! For starters, I set up one of the timers on the STM32 to put out a ~150kHz gate drive waveform. (Two complementary pairs, 180º out of phase with each other.)


Having confirmed, that the timers and outputs were working, I hooked up the 10-foot signal cable and did my best to scope the gate signals themselves. I switched back to the analog scope, because it's just not possible to get as clean a picture of the rise/fall on the crappy digital ones (yes, I am a scope hipster). I also made myself a hack low-inductance differential probe for measuring the high side gate signal:


Since I chose all the gate resistor values with two FETs in parallel, the gate drive on a single FET was a little faster than I would have wanted. (Switching too fast causes major di/dt and dv/dt transients as the frequency content of the switching waveform starts to excite the parasitics of the gate drive and MOSFET.) So, to slow things down just a little bit, I added a bit more external resistance to the output of the gate drivers:

I swear this was the best way to do this...
With a total external gate resistance of about 8Ω, here's the low side turn-off and high side turn-on with no voltage on the bus:


The rise/fall times are ~100ns and the deadtime is about 377ns, using 220-ohm / 1.5nF on the deadtime generating circuit. With bus voltage, the turn-on and turn-off will be longer due to the Miller plateau, but it should still be well shorter than the deadtime. At 150kHz, two 377ns deadtimes accounts for about 11% of the PWM cycle. This would be a bit long for motor controller operation, but it's okay for the Tesla coil driver, which will spend most of it's on-time operation at or near 50% anyway.

As usual, I built a Visual Basic GUI to control the whole thing:


It sets the drive frequency of the resonant circuit (for tuning to the resonant frequency), as well as the duty cycle profile over a finite number of cycles that make up a single "pulse" sent to the primary. The duty cycle for each cycle can be ramped up to some maximum value, held, and then ramped down. The GUI also sets the frequency at which the pulses are generated, which is what will ultimately be used to play MIDI notes. Here's a quick video showing the GUI tuning process with just the primary:


You can seem me playing with the pulse lengths, as well as the drive frequency and some other parameters. A single pulse on the primary with no secondary present looks like this:

Close-up.
Zoomed-out.
The current on the primary (measured using a current transformer) rings up to some maximum value quickly as the square wave voltage excites the resonant circuit. (The current itself is mostly sinusoidal.) Then, after the drive pulse ends, the energy in the primary is slowly dissipated in its resistance. With a secondary in place, energy would be coupled into the secondary coil and the primary current would look a lot different. But for testing purposes, using the primary alone at low voltage allows me to actually scope things.

The first thing to check is the primary resonant frequency. From the design, I was targeting something in the range of 135-150kHz. Tapping the real-life primary coil at approximately 6 turns gave me a resonant frequency of 154.5kHz, measured by sweeping the drive frequency around to find the maximum ring-up. This gives a primary inductance at 6 turns of 10.6μH, since the primary capacitance was easily measured to be almost exactly 100nF. So, I'll probably have to move the tap out a little to get it in tune with the secondary. (The target frequencies for best coupling were 151kHz and 136kHz.)

Next, I wanted to use the decay time to estimate the real-life primary resistance. I could probably have just put in the peak values as initial conditions in a SPICE simulation of just the primary LRC resonant circuit. But, since I have a full SPICE simulation of the driver already, I decided to make things more complicated by having my VB GUI export gate drive waveforms to the SPICE sim, which would simulate the entire pulse sequence. I then tweaked the resistance value until the decay envelope on the SPICE sim matched up exactly with the one on the scope:


The magic number in this case was about 90mΩ, which seems accurate given that the skin depth on my 8AWG grounding wire is probably making it act more like 14AWG wire. But anyway, I now have a more precise simulation of the exact pulse sequence, including ramping and duty cycle control. This should be useful when it comes time to ramp up the power.

Speaking of which, I discovered the USB limit for this power system. As is also the case on many of my motor controllers, USB communication and high power simply don't mix and above a certain current (40A in this case) the GUI starts to get comm. errors. Typically, the micro and all the logic circuity can continue to operate without any issues - it's just a problem with the serial communication. Since I suspected this might be an issue, the plan is to use an XBee link to between my laptop and the logic board, the same trick I use to get data off of motor controllers while they're running. It may seem like running an RF link instead of a wired connection would be a bad idea in a Tesla coil environment, but I've been down this decision path before and the XBee always seems to win...

Next step: ramping up the power, tuning, and hopefully generating the first sparks!