ARM-based processors generally scare me, maybe because people tend to put Linux on them, but for whatever reason the STM32 lineup seemed inviting enough for me to try out as my first venture into 32-bit embedded processors. And by "inviting" I mean the reference manual is only 1,072 pages long. But I like that I can actually find the reference manual, and the memory and peripheral organization is similar to what I have gotten used to with other microprocessors. It was just familiar enough to me that, combined with some good recommendations, I decided to make the STM32F103 the microprocessor featured in the wootstick 2.0.
It looks very similar to the woostick 1.1. And for good reason: The wootstick 1.1 worked really well as a combined USB/XBee-programmable development board. I kept all the USB/XBee stuff and just changed the microprocessor. Because the STM32F103 has a few more pins than the MSP430F2274, I had to rearrange a few components. No big deal, everything fit perfectly...except...something's not right.... With more pins, the headers take up less space?...
I accidentally used 2mm headers. So much for sticking it on a breadboard. I should redesign it with 0.1" headers. I really should. It's not that hard to change, right?... Then again, something about 2mm headers not fitting into a breadboard is appealing to me. After all, the majority of my wootstick 1.1-based projects were custom carrier boards, to which the processor board attached. Custom boards that just as easily could have used 2mm headers. In fact, how useful is a board that can fit in a breadboard if it only leaves one row left on either side? Why not just use a single row female header? Or solder directly to it instead?
Don't mind me...just debating with myself.
In the mean time, the biggest challenge of changing the wootstick microprocessor: implementing a new serial bootloader interface. Except, as I found out, ST already did that. It's called the Flash Loader, and you can get it here. The stock Flash Loader is not useful for wireless bootloading, because it doesn't let you manipulate the RTS and DTR lines. But, the command line version does. So, I wrote my own shell interface for it, which is way way way way easier than writing the entire bootloader interface from scratch, which I did for the MSP430. So much easier that it just worked right away:
It uses DTR and RTS to trigger the bootloader, then erases the flash and loads a new binary image. The binary image comes straight from the compiler, which is part of the IDE. As luck would have it, IAR makes a version of Embedded Workbench for ARM. I've been using IAR EW (MSP430 version) for the wootstick 1.1, since the KickStart edition is free. No learning of new IDEs. This is too easy. Well, I still have to learn how to write code for this microprocessor. The best I can do now is toggle a pin on and off, and even that I needed help with. I guess I should start reading that reference manual. After I learn how to use the timers: Harmonic Drive, the wootstick 2.0-based motor controller and 8-bit music engine.
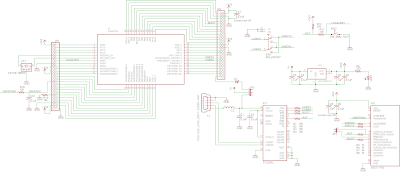
For reference, here is the schematic for the wootstick 2.0:
Click to enlarge.
New base unit for future projects! Very exciting.


http://leaflabs.com/devices/maple/
ReplyDeleteCompatible IDE?
(sry if there are more comments, but it's not displaying the 1. one)
Is that IDE compatible with this hardware? Probably. They use the same chip, so definitely with a bit of hacking.
ReplyDelete