Actually, that tiny little 2.2μF capacitor is of critical importance. It supplies the gate drivers, which are specialized chips that turn on and off the high-power transistors (MOSFETs) in the Cap Kart controller. They were formerly 1μF capacitors, but these new monster FETs have a gate capacitance of 0.25μF. So it's like if you have a bucket of water and a small garden hose to fill it and...well there's another taller, skinnier bucket and..... I don't know. It just needs more capacitance, okay?
And even with more buffer capacitance and smaller (5Ω) gate resistors, it still takes an eternity (i.e. two microseconds) to turn on and off these behemoths:
You can do it! Can you?
It's not the world's snappiest gate drive, but the passive shoot-through protection integral to this half-bridge design is working. You can tell by the delay between one gate turning off and the next one turning on. All that's left is some color-coordinated wiring:
Each gate gets a local pull-down resistor and 16V Zener diode for protection.
And the controller is pretty much ready to go:
Well, the hardware part anyway. The part that didn't change. As for the new control software...
What the...?
It's complicated. Or maybe it's simple. Either way, it's progressing. The goal is to implement constant-power field weakening on the SepEx motor. Before, we used fixed "gears" and a manual shifter to set the field strength. This is fun, but not as clean as a constant-power field weakening setup.
On the mechanical front, we've finally passed the state of maximum entropy and started putting things back on the kart. The battery trays were cut down to accommodate the smaller lithium-ion battery packs...
...which look damn good.
As it turns out, we have room for four more cells if we decide we need them. But for now we will be running 12S (39.6V nominal). This is a bit higher than the 36V nominal lead-acid setup, but it will be more than offset by a higher internal resistance per cell (more voltage draw-down). That's where an extra 12V from the capacitor may come in handy.
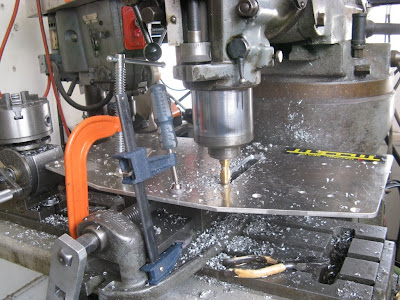
To accommodate the new motor orientation, a slot for the chain had to be added to the All-Purpose Mounting Shelf. (Seriously, everything we've added to the kart except battery trays mounts to this one quarter-inch plate.) This operation involved a bit of 80/20 mill fixture trickery.
The chain will pass down through the shelf to the custom-built axial differential. Speaking of which:
One side of DiffMaster Max's baby is done. The main radial bearing pressed cleanly into the side plate (on the side not visible). A thrust bearing (McMaster PN 5909K38) sits between the large output gear and the side plate. A spring clip holds the large gear in place on the output shaft. The four precision-ground gear shafts (three pictured) are to be screwed in from both sides. Two more shafts will provide structural support. Here's a video of the half-diff. Next: finish the second side plate, add spacers, and final assembly into the rear axle.
Coming soon to a parking lot near you.


Post like this really make me wish i went to MIT =/
ReplyDelete