Friday, August 31, 2012

KK2.0 Testing / Talon Cam Returns

After finding the makings of a complementary filter in the KK2.0 flight controller firmware and enabling it on the Talon Quad, I've been flying it for several days to test out the fast angle control. I've heard from a number of other people who have tried it with mixed results. Several people got it working, confirming that the self-leveling is faster and doesn't overshoot like crazy. But since it has, in at least two cases, lead to crashes, I'll just reiterate the warning that the modified firmware should be considered experimental and tested at ones own risk!

One thing that's 100% certain is that the self-level is set up for small angles. Do not expect it to recover from any position at any time. Do not try to fly acrobatically with self-level on. For one, the accelerometer component is mixed in only for angles that are less than a certain deviation from the horizontal. There's some confusion about what the maximum angle for which accelerometers are factored in is - I would guess based on my reading of the code that it's 26º.

Since the raw accelerometer inputs are treated linearly, the small angle approximation would allow less than 5% deviation from the true angle up to 30º and less than 10% deviation up to 45º. I might try increasing the maximum value for accelerometer merging up to the higher limit of 45º, just to give it more workspace for aggressive flying. Past 45º, the linearizations really start to break down and it would be wise to switch to a gyro-only estimate and hope for the best. (This is assuming that trig operations or other methods of handling large angles are out of the question on an 8-bit microcontroller.)

That's not the only problem, though. As KK himself points out in the now-226-page RCGroups thread, the simple controller based on two complementary filters begins to lose its fast attitude estimate when you combine a yaw command with either a pitch or a roll command:
Unfortunately it was not that easy. It works very well as long as no yaw is commanded when the craft is not level, as seen in the video earlier in the thread. If yaw is applied when not level, both roll and pitch angles change, but roll/pitch gyros does not sense this rotation, resulting in wrong angles. Try for your self with a airplane model in your hand.
That, plus a more direct warning:
In short: only yaw when level. 
Mathematically it makes sense. If you do happen to yaw while within the 26º (?) envelope, the accelerometer readings can still help the angles recover over time. But the fast gyro update is lost. If you yaw while outside the 26º envelope, all bets are off. Since my flying is decidedly conservative, it's possible that the problem had just never come up. So, more aggressive flying is called for.


I felt comfortable enough to put the GoPro back on. It's basically indestructible anyway, and it's a good way of registering the angle of the quad. You can see that I attempted, mostly successfully, some long moderately banked turns. This seems like the most likely scenario where a yaw + roll input would occur and where the sensors have enough time to stray from correct values. While in the turns, I had no trouble maintaining attitude. Coming out of the turns and returning to level flight was a bit trickier (I had one unintentional landing resulting in no damage), but not at all impossible.

Granted, I never really got past 30º in the banked turns. It could start to fail more catastrophically at steeper angles. But the ironic thing is that, until now, I've never felt comfortable enough with the performance of the self-leveling to even attempt these maneuvers. I can also fly nose-in and at larger height with much more confidence thanks to the faster and more stable angle control.

I can think of ways to handle the yaw + roll and yaw + pitch inputs at small angles (45º or less), and they only require math that the ATmega324PA should be able to handle. Maybe I will dig into the assembly more and try to implement something. But, 4pcb has lived this long with nothing but independent pitch/roll complementary filters. (Not that it's the most smooth-flying thing in the world...) Some day I'd like to make my own flight controller from scratch, maybe with a bit more fancy math on a 32-bit processor. But right now this is working very well for me.

Tuesday, August 28, 2012

More FFv1.2s Testing / The Short-Lived FFv1.3ss

After successfully testing one FFv1.2s motor controller on the Talon quad, I got enough parts to complete a full set of six.


Unlike the first prototype, I built these in the "minimum thickness" configuration, meaning no XBee or XBee headers. They can only be programmed with an FTDI breakout board. They also use lower-profile pushbuttons and inductors. Here's a comparison to the "minimum thickness" configuration of FFv1.1:


The overall dimensions are 2.00in x 1.50in x 7mm and 11.3g for the FFv1.2s board alone. (FFv1.1 board-only dimensions are 3.00in x 1.50in x 12mm and 28.4g.) With 16AWG wiring, an external DC bus capacitor, and connectors, the FFv1.2s controller weighs in at 35.1g. This makes it a much better fit for the Talon quad than the 66.0g FFv1.1 with giant D2Pak-7 FETs at 14AWG wiring.

With a cameo by Twitch.
I also switched back to the KK2.0 flight controller to make the Talon quad as light as possible. (You will see why in a bit...) I did a bit of firmware hacking on the KK2.0 to enable the fast angle estimate, which I describe in the previous post. The result is quite amazing: it now has very precise and fast angle control. After the first indoor test from the previous post, I have been further tuning it and flying outside. It's wonderfully stable and easy to fly now, even in some wind.

The controllers are all running closed-loop speed control, so the signal received is directly commanding an RPM. So far this has been working well. Here's a data capture from some outdoor testing with the KK2.0 + FFv1.2s ESC combination:


It shows several seconds of rapid back-and-forth roll inputs, followed by a few seconds of hovering, then a few seconds of climb. The RPM tracks well, although there are some small and rapid oscillations similar to what can be sort-of seen in the indoor test video. The oscillations are especially apparent in the current data. This is, I suspect, because the inner rate loop gains were slightly too high. Testing in the wind with lower rate P gain yielded much smoother flight (still with wonderful fast self-leveling).

The reason for reverting to the lightest possible configuration for the Talon wasn't to go easy on the new controllers, though. It was to try an ambitious payload. This quad normally carries a GoPro camera, which weighs about 200g with its impact-resistant case. The heaviest thing it's carried is my handheld video camera, at 300g. But with the new motors, I suspect it could carry a lot more. Enter TOBL2.

Photo credit: ycraf.blogspot.com.
TOBL2 is the second generation of Max's multifaceted iPhone-controlled robot, probably best known for it's wall-flip ability. It will be making an appearance at Marker Faire NY in September and we thought it would be cool to try to skycrane it with a quadrotor. At about 1lb (450g), though, the first step was to see if the Talon quad could even lift it...


Well that was relatively successful. Other than the swaying, which can probably be minimized with a better rope configuration, the payload seems to be fine. Now we just have to see if TOBL can lower itself down somehow...

The Short-Lived FFv1.3ss

I've been watching Texas Instruments' line of motor drive chips for a while now. In addition to the DRV8301, which has performed flawlessly as a gate driver / current sense amplifier / buck converter controller on FFv1.1 and FFv1.2s, I've been wanting to try out the DRV8332. The DRV8332 is a fully integrated three-phase driver, meaning logic-in / FET half bridge-out. It goes up to 50V and the heatsinkable version (8332) has a phase current rating of 8A continuous, 13A peak. 

And it's tiny. Perfect for FFv1.3ss (super-small?), I thought, so I started a layout for a 1.00in x 1.00in controller based on the DRV8332. To show just how small it is, here's a comparison to the IXYS mini-brick modules I use on the 3ph line of motor controllers:


The 1.00in x 1.00in board is roughly half the board area as the IXYS module alone. The blue chip on the back of the board is the DRV8332 itself. Unlike the DRV8301, it doesn't include the nice buck converter controller or current shunt amplifier, so there was a good deal of work to do adding tiny versions of those in:


The MSOP-8 on the left side of the board is a dual op-amp, configured for low-side current sense differential inputs using two resistor networks. I really liked this layout. The cluster of components on the right side of the board are two switching power supplies. The first, a wide-input buck converter based on the  LT3991-5, would allow me to take full advantage of the 50V input range of the DRV8332 while still supplying an efficient 5V/500mA BEC for logic and receiver power. The second, a tiny boost converter based on the LT3460, would supply 12V/100mA for the gate drive.

Sadly, that's as far as I got before shelving this design. It has a fundamental flaw that I hadn't considered until this point: the FETs in the DRV8332 are not that great. Even though its current rating says it would be a viable controller for something the size of the Talon quad, the FET losses make it not worth it. Even at a relatively modest phase current amplitude of 5A, the 80mΩ per-phase resistance would add 3W of total dissipation to the controller (with sinusoidal commutation). Compare this to the minuscule 0.075W that FFv1.2s would dissipate with with its Super SO-8 FETs. 

At 150W/kg, the rough power-to-weight ratio for the Talon quad, the extra 2.9W of dissipation would be equivalent to 19.3g of weight. So, to justify the tradeoff, the FFv1.3ss board would have to weigh 19.3g (or more) less than the FFv1.2s. (Assuming the wiring and capacitors weights are fixed, as they would be for a given current.) Since the FFv1.2s boards are only 11.3g, excluding wiring and caps, there is no way the extra dissipation of the FFv1.3ss is justified. 

Factoring in the weight of the necessary heat sink for the DRV8332, I'm not sure there is a likely scenario where it would be justified based on a power-to-weight analysis. If volume is weighted more highly than weight, as it might be for some other applications like a mini robot, the DRV8332 might win out. It might also be justified on size alone at very low current where the efficiency is less of an issue. But in that case, there are things like the Toshiba TB6588FG that I used on 4pcb which could probably do the job.

It's too bad, because I was really starting to like this layout. But it seems like it wasn't meant to be, as far as flying things are concerned.

Sunday, August 26, 2012

KK2.0 Firmware Mod: Unleash the Complementary Filter

The KK2.0 is HobbyKing's ultra-cheap ($30) multirotor flight controller, which I bought a few of for testing some time ago. Unlike its predecessor, the KK2.0 has a full 6DOF IMU with an InvenSense 3-axis gyro and an Analog Devices three-axis accelerometer.

That means it should be fully-capable of doing angle control (a.k.a. attitude control, self-leveling), where the joystick axes correspond to a commanded pitch and roll angle, and center-stick returns the multirotor to level. This is in contrast to rate control, where the joystick axes correspond to a commanded pitch and roll rate, and center-stick holds the current angle (but does not return the quadrotor to level).

Rate control is good for doing tricks and flips, but angle control is better in most other cases when you want to stay within say +/-30º of horizontal. If you get disoriented, you can go to center-stick and know that the quadrotor will return to level and not go rocketing off into the distance. It's also more well-suited to camera platforms, since it helps maintain a level horizon.

The KK2.0 has a "self-leveling" feature that I was very eager to try, but I was a little disappointed in the performance. It was sluggish, and increasing the gains to make it return to level faster would lead to pendulum-like behavior, especially in the wind. It would eventually return to level, but not before overshooting back and forth a couple times.

Skimming through the 200+ page RCGroups thread for the KK2.0, which is frequently updated by the designer of the KK board, it seems that in the initial firmwares (v1.0, v1.1, and v1.2), self-leveling is implemented using only the accelerometer angle estimate. From the tuning guide,
Q: Why is Autolevel so slow?
A: The autolevel is based only on the ACC. It takes some time before the ACC registers tilt due to the horizontal acceleration of the craft when tilting. It needs some speed to get air resistance and a force on the ACC. Therefore the autolevel works best on draggy crafts. Later I will try to implement a AHRS algorithm, which uses both ACC and gyros to get a immediate tilt angle.
This all sounds very familiar. I have explored the specific problem of creating an angle estimate using both accelerometers and gyros at length on many projects, using a technique known as a complementary filter. I used it on all the self-balancing things I've built or helped build, as well as two quadrotors: 4pcb and the original Edgerton Center copter.

Tangent: Two complementary filter implementations in simple code.

I won't go into the theoretical details here, since they are well-explained in several of the links above, but I will put forward the typical code snippet I use to implement the complementary filter on a single axis of the accelerometer/gyro data. It takes as its input the gyro rate (gyro_rate) and the accelerometer angle (acc_angle), pre-converted into compatible units (deg and deg/s, or rad and rad/s, for example). The accelerometer angle can be calculated with an arctan function or by linearization for small angles.

// Complementary Filter Implementation #1:
filtered_angle = (A)*(filtered_angle+gyro_rate*dt); 
filtered_angle += (1-A)*acc_angle;

The previous angle estimate is incremented by the small angle predicted by multiplying the rate by the loop time (dt). This gyro-only angle estimate is high-pass filtered. The accelerometer-only estimate is low-pass filtered and the two estimates are added to created the new filtered angle estimate (filtered_angle). The time constant of the high-pass and low-pass filters (they are the same) is:

tau = A / (1-A) * dt;

and it depends on the loop time. Larger time constant trusts the gyro for longer and filters the accelerometer more. Making this time constant long enough to overcome the time required for buildup of aerodynamic drag mentioned in tuning FAQ is the key. However, if the gyro rate has a lot of bias, a time constant that is too large can lead to offset in the angle estimate.

Interestingly, the complementary filter can also be formulated as follows:

// Complementary Filter Implementation #2:
filtered_gyro = A*filtered_gyro + (1-A)*gyro_rate;
filtered_acc = A*filtered_acc + (1-A)*acc_angle;
filtered_angle = tau*filtered_gyro + filtered_acc;

Unwrapping the math to show that this is equivalent to Implementation #1 above is a little tricky, but it definitely works out. The nice thing about Implementation #2 is that it's just two low-pass filters, a multiply, and an add. It could be done entirely in analog hardware if one so desired.

Ok but what does this have to do with the KK2.0?

Well, while browsing through the open-source KK2.0 firmware v1.2 (the latest at the time of writing) I stumbled onto a curious section of code. Now, it's entirely written in assembly, and it's been a long time since I programmed in assembly, so it took me some time to interpret it. It's in imu.asm in a section labeled "Calculate Tilt Angle" and another section labeled "Correct tilt angle". If I'm reading it correctly, it behaves roughly like this:

// Complementary Filter Implementation #3:
filtered_angle = filtered_angle + gyro_rate*dt;
error_angle = acc_angle - filtered_angle;
filtered_angle = filtered_angle + (1-A)*error_angle;

And I label it as Implementation #3 because in fact, if you rearrange the math, you get exactly the same thing as the other two. This version is formulated more as an error feedback approach, which is intuitive.

The strange thing about this complementary filter isn't that it's written in a different way...it's that it's entirely commented out! The complementary-filtered angle estimate (I call it filtered_angle, the firmware uses GyroAnglePitch and GyroAngleRoll) is never used. Instead, the self-leveling angle estimate is straight from the accelerometer (what I call acc_angle, and the firmware calls AccAnglePitch and AccAngleRoll).

Maybe it's a planned future upgrade and needs more testing. In any case I decided to turn it on and see what happens. I uncommented the "Calculate Tilt Angle" and "Correct tilt angle" sections in imu.asm. Two other lines also needed to be changed:

b16sub Error, AccAngleRoll, RxRoll ;calculate error

becomes

b16sub Error, GyroAngleRoll, RxRoll ;calculate error

and

b16sub Error, AccAnglePitch, RxPitch ;calculate error

becomes

b16sub Error, GyroAnglePitch, RxPitch ;calculate error

And that's it. Here is the modified firmware I used. No other changes were made to the project. If you want to stare at the code or rebuild the project yourself, you'll need AVR Studio. Otherwise, KK2_1V2_modS.hex is the file to be flashed. Note: Use at your own risk! Most likely, this is a future upgrade that may not be fully ready yet!

I wasn't really expecting this to work so easily, but on the fist test flight after loading the new firmware, I was able to increase the self-level gain  a bit and get very nice angle control:


The stick response is very fast. Going back to center gives very fast return to level, with no overshoot and no pendulum effect. It now flies as well or better than other (way more expensive) flight controllers I've tried. I'm sure that by tuning the complementary filter time constant, the self-level P gain and the inner rate loop PI gains, I could get it to be even better.

So now my $30 flight controller looks like an incredibly good deal.

Sunday, August 19, 2012

FFv1.2s: First Test

I got the boards for FFv1.2s, a slightly smaller version of my latest line of motor controllers:


The boards are from OSH Park (formerly DorkbotPDX PCB Order, you might be able to tell by the color scheme). It's a terrific deal for small boards: $5/in^2 for three boards. For example, this board was 3in^2, so I got six for $30. The total time from order to delivery was a bit under three weeks.

These boards have exactly the same logic section as v1.1, but an entirely redesigned, smaller power section. Instead of massive D2Pak-7 FETs, it uses Super SO-8s. These are extremely popular in RC ESCs because of their low cost, relatively high power density, and thin package (more compact and easier to heat sink). I'll be trying two different FETs: the Infineon BSC016N04LS G (40V, 1.6mΩ) and BSC028N06LS3 G (60V, 2.8mΩ).

One difficulty with using Super SO-8 FETs is that, although it's possible to solder them from the sides, good thermal performance will probably only be possible if the drain pad under the chip is reflowed. The DRV8301 magic chip needs its ground pad reflowed anyway, so this doesn't add any extra steps for me.

It's just one trip to the bagel toaster.
Even though v1.2s is only reduced to 2/3 of the area footprint of v1.1, there's also a significant reduction in height thanks to the low-profile FETs:


The left-most board is a v1.1 without any wires or external capacitors. The middle board is v1.2s with XBee headers fitted. The right-most board is v1.2s with no XBee headers. In the smallest configuration, it's 7mm in thickness. The tallest components are now the three pushbuttons, and even those are lower profile versions of the ones in v1.1.

Here's what it looks like wired up:


The total weight with 16AWG wire and connectors is 35g, compared to 66g for FFv1.1 with 14AWG wire. Most of the weight is in the wire and connectors. The FETs are nowhere near as beefy as the D2Pak-7s, but I think the 40V/1.6mΩ version might still be able to handle 20A continuous and 40A peak current. (Compared to ~40A continuous and 75A peak for v1.1.)

The first assembled board survived power-up without exploding, so therefore it was flightworthy.


Poor Talon quad - it really has become a test bed for just about every piece of hardware. It has so much stuff attached to it now in such a disorganized and heavy way. I put a single FFv1.2s on, loaded with identical firmware as the other three v1.1's. Since they're running closed-loop RPM control now, the slight mismatch shouldn't matter much. Here it is ready for its first test flight with the Chair of Safety still in place:


After a few successful indoor test flights, I also took it outside a few times with the data collection running. The data is from the v1.2s, which was fitted with the XBee. The other three v1.1's are running blind. Here are a couple data segments showing climbs and fast maneuvers:


RPM tracking looks good and the average current is around 5A, peak 10A. The FETs are room temperature and I suspect I won't be able to even get them warm until I try it out on the CineStar...

One more motor controller done. Time to start a new one. Here's the teaser:

Monday, August 13, 2012

FFv1.1 Air: Closed-Loop RPM Testing

With the ground firmware working well on a few test vehicles, I've moved back to the air firmware for the FFv1.1 motor controllers. (My motor controller page has finally been updated!) The challenge for the past week was to get the air firmware working in closed-loop RPM mode on the Talon quad, which has nice new motors and a new flight controller for testing.

Closed-loop RPM means that the input signal, a servo-style PWM pulse, commands a specific motor speed. (For example, 1200-1800μs could be mapped to 0-5000rpm.) In RC helicopter terminology, this is called "governor mode" and would be used to hold the rotor speed constant as the blade pitch is varied. It's not typically used on multirotors, since they have fixed-pitch propellers. But there are some performance advantages if it works well. It's also an interesting control system challenge, so I had to try it.

I had previously demonstrated closed-loop speed control with the large hexrotor motors, but the performance was very sluggish and at the time, I decided to use normal voltage (really duty cycle) control for the first test flight. It's the method that most commercial BLDC speed controllers use, and it's reasonably fast, limited only by the ESC's internal filtering. It's also a good approximation to RPM control since applied voltage is roughly proportional to motor speed in steady-state. (IR drop causes some non-linearity.)

The downsides of direct duty cycle control are that it offers no chance to limit motor current and it can't compensate for IR drop or slight differences in motors. Most of the multirotors I've used have cheap motors, and there's always one that's just a little worse than the others... Closed-loop RPM control can solve this problem by ensuring that the same command causes all the motors to spin at the same speed. 

Since I already have a current control loop from the ground firmware, adding an outer RPM control loop seemed like it would be easy. This was the loop structure I used in my first closed-loop RPM post:


Motor speed is measured by the flux observer and compared to the desired motor speed to create an RPM error. The error is sent through a PID controller and the output is the demanded current. While there's nothing wrong with this scheme, it happens to be fairly slow. There must be an RPM error in order for the PID controller to have an effect, so it's always chasing the target. To achieve faster performance, I added a feedforward term:


The feedforward term goes from RPM command directly to the current command, bypassing the PID (or in this case, PI only) controller. In steady state, motor current is proportional to the square of motor speed, due to the aerodynamic drag on the propeller. The target current is therefore set to the expected steady state current for a given RPM command, plus a P.I. term to handle transient (accelerating) current and any offset from the expected value. The constant of proportionality for the feedforward path is determined experimentally.

The speed-squared relationship of aerodynamic drag has other consequences for the closed-loop controller: 1) The damping ratio of the plant increases with speed. and 2) The damping ratio is different for increasing and decreasing speed steps. To deal with these effects, I made the gains for the outer PI loop speed-dependent and asymmetric. I don't like speed-dependent gains, but in this case it seems unavoidable for achieving good performance over a large speed range. Higher speeds get higher gains. Increasing speed gets a higher gain than decreasing speed.

The new feedforward structure, combined with speed-dependent gains for the RPM controller, improved the performance a lot. As a baseline, I implemented this scheme on the new Talon motors and tuned the PI gains to get the RPM step response as fast as possible.

::clamps quadrotor to nearest heavy object::
As expected, increasing the gains eventually led to oscillations. The test was a step input change from 2000rpm to 4000rpm. I stopped at a point where the overshoot was about 10% which was with a 0-100% rise time of 200ms. This is Plot #1 below:


To confirm this baseline, I put all the gains and plant specifications into a simulation of the controller/motor/prop system. What I found was that the real-life system was oscillating a lot more than the simulation, with the same gains. That meant there was an unaccounted-for bandwidth limit in the real controller. I spent a day tracking it down. I had already accounted for both the current and the RPM measurement filters, so it had to be something else.

The bandwidth-limiting element turned out to be the high-speed position filter I added a while ago. Above a certain speed, it merges the interpolated electrical angle with the angle indicated by a flux observer zero-crossing. At constant speed, the error between these two angles should be zero mean and the filter doesn't cause any lag. But during acceleration, the interpolated angle will lag the true angle by some amount. This lag was causing oscillation in the D-Axis current controller, which in turn was limiting the overall closed-loop bandwidth.

The solution was simple: I turned the high-speed position filter off. It seems not to be necessary now, possibly because I fixed the problem of flux offset at high speeds. Whatever the reason, the oscillation went away and the real step response looked a lot closer to what the simulation suggested it should (Plot #2). From that point, I made a few small changes to push to faster rise time:
  • Changed the RPM estimator from updating once every mechanical cycle (7 electrical cycles) to once every 3 electrical cycles. This decreases the effective low-pass filter time constant in the RPM feedback path. The tradeoff is RPM resolution at high speeds, but 3 cycles seems like a reasonable compromise. Result of this change is Plot #3. The small overshoot in Plot #2 is eliminated.

  • Doubled the gains. The result was a slight increase in rise time, but the overshoot also returned (Plot #4).  It was clear that increasing the gains more would bring back oscillations.

To improve the rise time (and the closed-loop bandwidth) further, I could speed up the inner current loop by increasing its gains or decreasing the time constant of its low-pass filtering. But the current measurements are noisy and having the filtering in place helps keep sensor noise from being amplified. (It's the classical controls trade-off between closed-loop bandwidth and noise rejection.)

I chose a different option, which was to add another feedforward path. This one goes directly from RPM command to voltage (duty cycle) output:


In some sense, this feedforward path is exactly the direct duty cycle control from before. A step increase in RPM immediately increases the duty cycle to the value that would be expected to produce that RPM in steady state. The output doesn't have to wait for the RPM or current error to build up, so the gains of the feedback controllers can be kept lower.

There is a downside, which is that the feedforward path bypasses the current limit. In the case of a large step increase in RPM command with a low-resistance motor, a short burst of current over the limit could occur before the PI controller has a chance to compensate for it. Depending on the system, a slew-rate limit on the feedforward path could be used to prevent this.

Plot #5 shows the effect of the RPM-to-voltage feedforward path. The 0-100% rise time is cut to under 100ms with acceptable overshoot and very little oscillation. The Q-Axis current instantly rises, rather than building up, giving a short burst of torque to speed up the motor. In this case, the current pulse seems within reason for what the MOSFETs can handle (although what's plotted is filtered current - the instantaneous value on the time scale of one PWM cycle is higher).

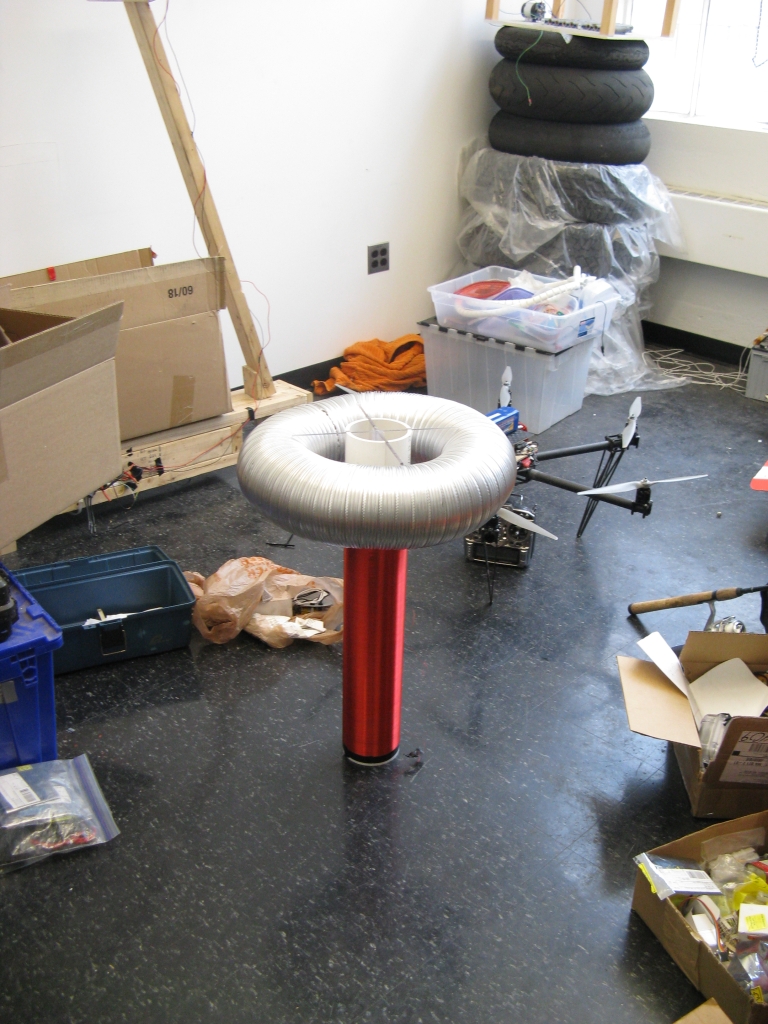
Satisfied with the step response, I loaded the new closed-loop control mode onto four FFv1.1's and set them up on the Talon quad:


And here is some data from the indoor test flight showing RPM command tracking:


Despite being very heavy (1.375kg), it flies nicely with the new motors, closed-loop RPM control, and new flight controller. It won't stay in this configuration, since it's too heavy to carry the GoPro now. But it will make a great test platform for the smaller FFv1.2s controllers that I have sitting on my desk waiting to be soldered. As for the larger FFv1.1's, they're most likely going back on the CineStar 6 next...

Wednesday, August 1, 2012

DRSSTC Δt1: Windwindwindwindwindwind.

I think I spent way too much time designing my (very first!) Tesla coil, so now I have to catch up by actually building it before the end of the summer. Over the weekend, I got started by winding the secondary. It's ~1500 turns of 28AWG magnet wire around a 4" PVC pipe. Having wound motors by hand before, I'm in no way a hand-winding purist and whatever gets the job done fastest is what I would go with:


I made a makeshift live center out of a 4" RC car wheel (riding on a shaft in the drill chuck) and got to work winding using the MITERS lathe as a hand-winding jig. (Not powered, although I'm sure that would work as well.)


In total it took about 2-3 hours to do. Definitely tedious work, but not as bad as winding a motor I think. I calculated that if I had turned the lathe on it would have been done in 7.5 minutes. But, it also might have snapped halfway through and ruined the whole thing. It would also have been difficult to check for crossed turns at that rate. I'm sure that with practice it could be done.

Before I did the winding, I cut four slots into the top of the PVC pipe in order to fit in two interleaved toroid holders. These are just polycarbonate cutouts that hold the 5" aluminum ducting that makes up the top load:

CineStar 6 and 2x4 Scooter, for scale.
I will probably coat the windings in polyurethane finish to protect them. But otherwise, the secondary is done!

In the design, I talked a bit about the driver's power electronics but I hadn't quite finished the signal board's layout at that point. The signal board is actually pretty simple: it will use one of the wootstick 2.0 STM32F103C4 dev boards that I used for several motor controllers. The wireless programming may come in handy for this project.

As far as the STM32F103C4 is concerned, its only job is to drive four LEDs in short bursts of square waves, which is the beauty of optocoupled gate drive. It should, ideally, have no idea that it's connected to Tesla coil power electronics. I will attempt to get it running at 72MHz so I have plenty of time resolution for fine-tuning the drive frequency.


The left-hand side of the board has the wootstick 2.0 board and LED gate drive outputs. The right-hand side has some switches for driving a precharge relay, main contactor, and gate drivers from a separate 14.8V battery. The two sides are connected by an isolated 12V-to-5V logic supply (DCR021205).

The tricky bit will be connecting this board, which will be some distance from the coil, with the power board, which will be heatsinked to the coil base. The plan for now is to use a series of shielded 3-wire cables: two for the gate drive signals and one for 15V power to the gate drivers. The good news is that the gate drive signals are fairly low impedance, since they have to drive LEDs. That should make them less susceptible to EMI. The bad news is that the entire thing could still get stuck by an arc. So, around the set of three cables for some distance out from the coil, I will add an outer shield to secondary (coil) ground.

Next up: building the primary and the base.